2010年10月30日星期六

How to upload videos to YouTube from iMovie

Making movies on your Mac is fun and easy, but how do you share them with the world? Many people choose to upload videos to YouTube from iMovie.
Part 1, How to upload videos to YouTube from iMovie HD
Part 2, How to upload videos to YouTube from iMovie

Part 1, How to upload videos to YouTube from iMovie HD
1. Make sure your video is the one you want to upload, then click the share button in the menu bar.
2. Select the QuickTime option.

upload video to youtube

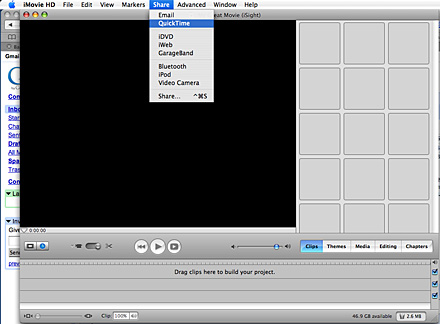
3. Click on the menu for your compression options and select web.

upload video to youtube

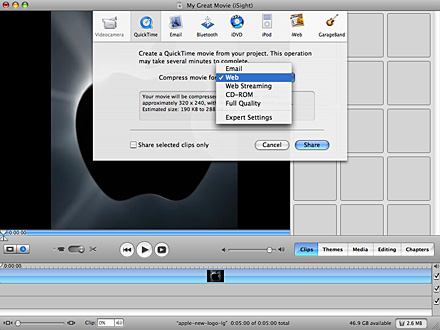
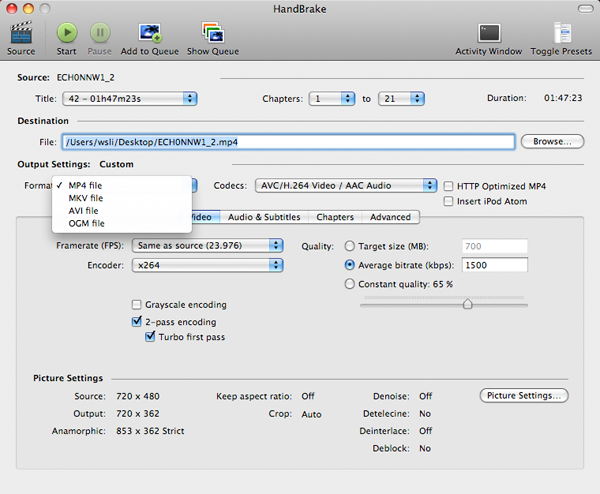
4. Save your movie to the desktop or somewhere else. Find your movie and click it once then press apple+I to get its information. Make sure it is less than 100 megabytes or YouTube will not accept it.
5. Log in to YouTube and click on the “upload” button at the top of the page.
6. Enter the name, category, tags and any other information you want for your video.
7. Next click on “upload a video” once you have finished entering your videos information.
8. Click on the “Choose File” button and choose your video file from were you saved it. Make sure its your compressed QuickTime video and not the iMovie file.
9. Lastly click on the “Upload Video” button, it may take a few minutes for your video to upload and it may take several hours for it to show up on YouTube.
I also recommend CD quality. You can save the movie to CD-ROM and then you can upload movie from iMovie HD to YouTube!

Part 2, How to upload videos to YouTube from iMovie
1. Make sure your video is the one you want to share, then click the share button in the menu bar and select YouTube.
2. Choose your YouTube account or create a new one
3. Confirm your sign in.
4. Select the category, name, description, and tags for your video.
5. Select your publish size and click Next
6. Now click the publish button.
7. Your video will be ready to watch on YouTube in 2-120 minutes.

Google has released basic software called Vidnik which is the quickest, simplest way to make movies using the built - in camera on your Macintosh and upload those movies to your YouTube account. You must first sign up for a free YouTube membership to upload videos.
Learn more: How to upload videos to YouTube easily and quickly on Mac?

2010年10月29日星期五

How to import music from iPod to iPod without iTunes

Ever since iPod was released, millions of people have been crazy about it. There appeared some assistant tools to manage iPod without iTunes:
1. Aiseesoft iPod Manager for Mac is one of the best Mac tools that can transfer Mac to iPod Shuffle, iPod backup for Mac. It is the best for iPod iTunes Mac software.
2. Aiseesoft iPod Transfer is another Windows all-in-one tool including iPod to iPod Transfer, computer to iPod Transfer and iPod to computer transfer.

Part One: How to manage iPod without iTunes on Mac. (Transfer Mac to iPod Shuffle, iPod Backup for Mac)
1. Download and install Aiseesoft iPod Manager for Mac.
For Intel:http://www.aiseesoft.com/downloads/mac/ipod-manager-for-mac.dmg
For Power PC: http://www.aiseesoft.com/downloads/mac/ipod-manager-for-mac.dmg

2. Connect iPod to Mac via USB.

Transfer Mac to iPod Shuffle:

Transfer Mac to iPod Shuffle:

Select “Music”, “Video” or “Picture”. Then click “Mac to iPod” to choose the files you want to transfer to iPod. Click “Open” to finish the transfer.

iPod Backup for Mac:

iPod Backup for Mac

Select files you want to backup. Click “iPod to Mac” and find the place where you want to transfer your iPod files to your Mac and click “Open”.

Part Two: Computer to iPod Transfer, iPod to iPod Transfer, iPod to Computer Transfer for Windows users
1. Download and install Aiseesoft iPod Transfer.
2. Connect iPod/iPhone to computer.

iPod Transfer

Computer to iPod Transfer
Click “computer to iPod” button to seek the files or folders that you want to import to iPod and click OK.

iPod to iPod Transfer
Pick the files that you need to transfer. Just click “iPod to iPod” button and it will show you the folder of another iPod that you want to transfer to. Click OK. The transfer can be finished automatically.

iPod to Computer Transfer
Check the file(s) you want to export in the file list. Click “iPod to computer” button to select the destination of the exporting files and start exporting files.

Hope it helps you!

2010年10月26日星期二

MKV file, MLV player, Free MKV Converter and MKV Burner on Mac OS

What is MKV file?
.MKV is a container format developed by Matroska. Matroska file types are .MKV for video (with subtitles and audio), .MKA for audio-only files and .MKS for subtitles only. The most common use of .MKV files is to store HD video files.It can hold different types of video and audio. For example, there might be an .avi file contained within the .MKV file. High Definition movies in 720 or 1080 pixel width format are often encoded and packaged as a Matroska format video with a .MKV file extension.

How to play MKV file s on Mac?
I recommend trying either MPlayer OS X or VLC Media Player. They are all free.
These excellent and free multimedia players can tackle many of the video formats unknown to QuickTime. They contain a decoder to decode the .MKV files. They will also play many of the formats you will find inside the .MKV file.
How to convert MKV to DVD, MP4, AVI, etc on Mac for free?
I recommend VisualHub to convert MKV to MP4, AVI, etc on Mac. It can convert MKV to iPod Nano, convert MKV to iPod Classic, convert MKV to iPod touch , convert MKV to iPhone, convert MKV to Apple TV, convert MKV to Xbox 360, convert MKV to PSP, convert MKV to PS3, AVI, convert MKV to MP4, convert MKV to MPEG, convert MKV to Flash, convert MKV to WMV and convert MKV to DVD.
Techspanion (The developer of VisualHub) has closed shop and after an outcry from fans, VisualHub, the popular video converter on Mac OS X have now gone open source. It has got new name Film Redux. You can download its open source and built it by yourself. Here is a tutorial: How to build iSquint and VisualHub?

Convert MKV on Mac

Step 1, Run Film Redux (VisualHub)
Step2, Load MKV videos
Insert your MKV files from your Mac .Click the Add files button to load your MKV videos.
Step3, Convert MKV to MP4, AVI, iPod, etc.
Here is the list of the formats that VisualHub can convert MKV
They are iPod Nano, iPod Classic, iPod touch , iPhone, Apple TV, Xbox 360, PSP, PS3, AVI, MP4, Quicktime, MPEG, Flash, WMV. Choose the format you want to convert MKV to and click Start.

VisualHub - convert MKV list

That’s all. Now, we have converted MKV to iPod Nano, iPod Classic, iPod touch , iPhone, Apple TV, Xbox 360, PSP, PS3, AVI, MP4, Quicktime, MPEG, Flash, WMV.
How to convert DVD to MKV on Mac for free?
I recommend you use Handbrake to you to convert DVD to MKV on Mac . HandBrake is an open-source, GPL-licensed, multiplatform, multithreaded DVD to MPEG-4 converter. It can convert DVD to MKV on Mac eaisly and for free.
Step 1, Download and Install Handbake
Download the free program Handbrake. Check to see if your Mac has the system requirements; click on the apple icon in the top left corner and About this Mac. Then install HandBrake.

Handbrake - convert DVD to MKV

Step 2, Run it and insert DVD.
Select your favorite DVD disk and put it in the disk drive. Then run HandBrake and click Detected Volume to choose source. Click Open and you will be able to see many titles included in this DVD disk. Choose the longest title if this is a movie DVD, or choose your favorite chapter if this is an episode.
Step 3, Select Output setting
Select MKV files as output format and select other settings such as video quality, audio track, Audio Sample Rate, bitrate, Picture Settings, etc. Handbrake - select output setting

Step 4, Rip DVD to MKV on Mac
Check all settings and click Rip. A progress bar will show its ripping speed; depends on many factors like speed of Mac, filesize, etc.
That’s all. We have converted DVD to MKV for free now.
Note: Handbrake can not rip encrypted DVD movies. If you want to rip encrypted DVD movies, you can use this DVD Ripper for Mac. You can also use Mac the ripper which is free.

2010年10月24日星期日

SCVNGR Ups Its Game With New Apps

SCVNGR, hunting for ways to keep pace in the competitive social location space, today turned loose freshly revamped versions of its iPhone and Android apps. SCVNGR stands out from the crowd by going beyond simple check-ins and emphasizing the game aspect by posing real-world challenges for users to complete. The new apps deliver a slicker dashboard, more real-world rewards for challenges, improved commenting and a mapping tool to find your friends.

2010年10月22日星期五

Who, Us? Netflix Says Its Customers Aren’t Cord Cutters

Here is the standard cord-cutting formula: Tell your cable company to pound sand and replace it with an antenna, an Internet connection and a Netflix subscription.

Except, says Netflix CEO Reed Hastings, that’s not what his 19.6 million customers are doing.

Responding to a question during yesterday’s earnings call, Hastings told analysts he doesn’t see any evidence that his customers are choosing Netflix instead of cable. They’re using it to augment their cable subscription, he said: “We still see no evidence that our subscribers cut cords at a greater rate than the population.”

That contradicts both popular wisdom, as well as at least one recent survey, which found Netflix subscribers using the service as a cable substitute. Then again, a competing study from BTIG’s Rich Greenfield (registration required) found that hypothetical cord cutters are only slightly more likely–by a margin of 51 percent to 49 percent–to have Netflix.

And the existence of cable-cutting itself is still very much up for debate in the TV business. Cable companies like Comcast insist that they don’t see evidence of it. But Ivan Seidenberg, who runs cable competitor Verizon, says it’s inevitable.

Netflix, meanwhile, has been consistent in arguing that it’s not helping anyone do any snipping. Here’s Hastings answering a similar question during an earnings call three months ago (PDF):

Q: Do you see any evidence that Netflix subscribers are inclined to either cancel multi-channel video subscriptions, or to pare back use of premium services such as Starz, Encore, HBO?

A: No, we haven’t seen any evidence of that and there’s no evidence in the total numbers of those firms in last quarter’s financials and total subscribers, so total multi-channel video subscribers is continuing to grow in the US. Premium subscribers is not showing any decline, so I don’t think there’s any material cord cutting. I think what’s happening is the multi-channel video, such a broad package with an incredible array of products, that we’re a tiny little fraction of that, and our subscribers view us as a supplemental service, and because it’s a modest cost at $9 a month, it works for them and their budget.

The numbers bear Hastings out: In the past year, his service has added 5.8 million subscribers. If, say, 20 percent of those new customers were cord cutters, you would have seen cable rolls drop by more than one million people. But so far we’ve only seen a 200,000-person drop, in the second quarter of 2010. And some analysts think that number will turn positive for the rest of the year.

But that doesn’t mean Hastings doesn’t plan to cut directly into the cable business in the future, when Netflix has a truly comprehensive streaming video catalog. Which means it’s worth asking Hastings about cord-cutting every quarter.

One of these days you might get a different answer.

2010年10月20日星期三

“The View” Versus “The Talk”

It’s a smackdown of chit-chatting ladies, as CBS’s “The Talk” debuted this week, in an attempt to grab audience from the powerhouse daytime ABC talk show, “The View.”

It’ll be hard, since those are some tough women on “The View,” which recently was in the spotlight after Whoopi Goldberg and Joy Behar walked off the set in the middle of a segment with Fox News cable pundit Bill O’Reilly, after he impugned Muslims.

Here is a clip from “The View,” in which O’Reilly comic clone Stephen Colbert pretends to walk off the stage.

It’s followed by an opener for “The Talk”–the best part comes at the end, when Julie Chen’s husband, CBS CEO Les Moonves, offers his support in a welcome video, but also threatens to cancel the show if ratings are not good.

2010年10月18日星期一

Using iMovie to edit videos on Mac for free

This is a tutorial which explains the process of editing videos on a PC using Windows Movie Maker and editing videos on Mac using iMovie. This tutorial will be a concise explanation of how to editing videos for free. Then share your movie via the Web, e-mail, or CD. Using dvd burner you can even take movies you've made and turn movies into DVDs.
You can also save your movie back to the video tape in your camera to play back on a TV or on the camera itself.

This tutorial includes three parts, this is part two:
Part 1. Using Windows Movie Maker to edit videos on PC for free
Part 2. Using iMovie to edit videos on Mac for free
Part 3. A table that compares free video editors.

iMovie '08 makes viewing and working with video as intuitive as enjoying your photos. A built-in library automatically organizes your video, so all the clips you've captured and movies you've created are just a click away. With its revolutionary interface, iMovie makes it quick and easy to browse your library and create new movies. And iMovie is built for sharing. In just a few steps, you can add movies to your website, publish them on YouTube, and create versions for iPod, iPhone, and Apple TV.

iMovie - edit video

Step 1, Create an iMovie Project
Before doing anything in iMovie, you must create and title a new default folder as well as title and save our new project.
Step 2, Connect DV Camera
Make sure the camera is in PLAY (VCR) mode
Step 3, Add video
When your viewer says "Camera Connected," click the "Import" button. iMovie will play and import your digital video. When you wish to stop importing, click the "Import" button once more. Drag your imported clip(s) from the clips pane to the editable timeline along the bottom of the iMovie interface. iMovie treats deleted files differently that most other programs. If you delete a clip you CANNOT get it back.
iMovie will also allow you to import the following file formats:
3gp, AVI, DAT, MOV, MP4,MPG
If your videos are not the format that is compatible with iMove such as FLV and M4A, AIFF, AAC, you can use the video converter for Mac to convert the video first.
Step 4, Edit video
To Split a Clip: Place the cursor beneath the viewing window at the place in the movie where you want to split the clip into two. Go up to the "Edit" menu at the top, and select "Split Video Clip at Playhead."
To Crop a Clip: Drag the little triangles beneath the viewing window timeline to the desired in and out points. Go to the "Edit" menu at the top and select "Crop."
To add effect: Select "Effects" from the menu below the clips pane. Select a clip from the editing region to add an effect to it. Select an effect. Adjust the parameters of the effect beneath the preview window. The effect should automatically preview in the preview window. If you adjust the parameters of the effect, click "Preview" again to load the new effect settings. Click "Apply," and wait for the effect to render. You can monitor the effect rendering by the red progress bar that occurs within the clip the effect is being added to in the editing region. Save your work.
Step 5, Save your project
From the main menu, go to File > Save Project.
If you want to convert the movies made by iMovie to other video format, you can use this video converter for Mac. If you want to burn the movies made by iMovie to DVD, use DVD Creator for Mac.

2010年10月17日星期日

Three Ways to Download Music To Your Zune Player

There are several ways you can download your Zune movies, Zune music videos, Zune MP3's and Zune software to your Zune player.
1) The first is from the Microsoft Zune Marketplace and other Pay-Per-Download Sites which have movie downloads, music downloads, music video downloads, and more. The problem with downloading Zune files from places like Microsoft Zune Marketplace is the cost. The Microsoft Zune Marketplace charges a monthly subscription service called the "Zune Pass" with unlimited downloads for $14.99 per month. The pay-per-download sites charge on the average about $1.00 per Zune download. So, with a Zune player that has a 30 gigabyte hard drive whic allows users to store up to 7,500 Zune MP3s, 2,500 pictures or 100 hours of Zune movies and Zune music videos, that is going to cost a fortune to fill up.

2) WiFi - Microsoft Zune players has a technology called WiFi which allows friends and family to share Zune music, Zune movies, Zune software, pictures and Zune music videos both effortlessly and wirelessly. If you have a cool picture or something you found on a zune download site you can share it easily. Anytime you come in close range of another Zune player you can connect to that Zune player via WiFi and share your Zune downloads. The only drawback is you can only play a shared song only 3 times before it is deleted although, pictures are saved and can be viewed many times. It's a nice feature but needs improvement.

3) The third way is by ripping your music CD's to your Zune player. The definition of ripping means converting CD music files to a file format usable by your Zune player which is either in MP3 or WMA file format. After doing this, all you need to do is plug your Microsoft Zune player into your computer with a USB cable and transfer the ripped music files to your Zune player using the provided Zune software.

1. Put the music CD that you want ripped into your PC.
2. After the media player opens. Select the song you would like to copy and click on RIP.
3. Save the song you just ripped to a folder of your choice.
4. Plug in your Zune Player to your PC using the USB Cable. The Zune Software will automatically search for music that you saved in the folder on your PC. Select the files you want and manually drag and drop them into your Zune player's music folder.

Related theme:
New Zune review part 2-1
New Zune review part 2-2
New Zune review part 2-3
New Zune review part 2-4

Recommended Products:
DVD to Zune Converter
This Zune Converter can convert or rip DVD to what you want video/audio formats.
Zune Movie Converter
It supports convert video to Zune supporting video and audio format.

2010年10月16日星期六

How to Make iPhone Ringtone

You bought an iPhone and love all its features, but wish you didn't have to pay for your songs twice to get a ringtone. (We know that iPhone, iPhone 3G Ringtones use the file extension .M4R. And the users must pay $2 for a piece of song through Apple iTunes store). There are plenty of songs in your music library, but no way to make ringtones from any of them. Rihgt?

Actually, with a little bit of trickery (nothing illegal) you can create ringtones from any one of your non-DRM songs.

This works on both Mac and Windows PCs.

Window Users

You can create free iPhone Ringtones by yourself with Aiseesoft iPhone Ringtone Maker.
You can take the following step-by-step instructions to start.
Step 0: Download and install Aiseesoft iPhone Ringtone Maker.
After a short while, you can see the following interface:

iPhone Ringtone Maker

Step 1: Click "Browse" on the right side of "Input File" to import the file that you want to make ringtone from it.
Step 2: Play it and listen the music to find the segment that you want to use it as ringtone. Then drag and click the start & end slider to set your wanted segment, or type the start & end time in the corresponding text box directly to get the exact segment. You also can pre-listen the converted audio before generate.
Step 3: Click "Browse" on the right side of "Local Output Folder" to choose the output destination.
Step 4: Check "Export to iPhone" option, the converted ringtone will be load to your iPhone directly.
Step 5: After all the settings are finished, click "Generate" to begin making your own iPhone ringtone.

Key function
* Convert any video to iPhone ringtone M4R
* Create iPhone ringtone from any audio files
* Get any clips from video and audio
* Edit Added iPhone ringtones

Using Aiseesoft iPhone Ringtone Maker, you are free to edit the added iPhone ringtone by removing it or renaming it directly.

For Mac Users, please go to Aiseesoft iPhone Ringtone Maker for Mac.

2010年10月11日星期一

Google Puts the “Auto” in Automobile

Google is all about searching, and among the many things it’s searching for are ways to improve car safety and traffic problems. And to that end, the company has been testing a remarkable bit of technology–automated autos capable of driving in traffic. The Goomobiles have been cruising around California, guided by a combination of video, radar, laser rangefinder and detailed maps (and occupied by by a driver and software engineer for backup). Google figures such technology can cut accidents, boost car sharing, reduce traffic and free up more productive time for the occupants of such vehicles, once they learn to relax.

2010年10月10日星期日

CNN: Minority of Web Users Shares Majority of News

Just 27 percent of social media users account for 87 percent of shared news, according to new research from CNN. The study, which was conducted over two months and tracked 2,300 people, looked at different motivations for sharing, as well methods and content. Not surprisingly, social networks accounted for almost half (43 percent) of shared news.

2010年10月8日星期五

Don’t Stick It In

Talking to a computer security researcher about Stuxnet is like asking an art critic to describe the finer points of the Mona Lisa. The world’s top cybersecurity minds are absolutely in awe.

Read the rest of this post on the original site

2010年10月6日星期三

Gphone vs iPhone, which is better?

As iPhone is the most talked about smart phone on the planet and it has won millions of hearts of users by his multi-touch screen and other powerful/beautiful design. Of course, iPhone has brought so much money for Apple.
On 23rd, Sep 2008 Google released G1 and claimed that they will have a share of the big market of smart phone.
So, which is better about iPhone and G1? That maybe asked by many people who want to buy a new phone. Here I will give some of opinion about G1 and iPhone.
I will compare these two phones in three aspects, hardware, software, and their performance as a media player.

Gphone vs iPhone

Part 1: Hardware.

1. The price and storage memory
First, the price and storage memory is what I concern most, for iPhone $199 8GB, $299 16GB, for G1 $179 1GB. When you see this you will say G1 is $20 lower than iPhone but G1 is only 1GB and you will pay another $40 for an 8GB SD Card. So I think iPhone win in this round.

2. Appearance
iPhone is 133 grams/4.7 ounces and G1 is 158 grams/5.57 ounces. G1 is taller while iPhone is thinner (G1: 117.7*55.7*17.1, iPhone: 115.5*62.1*12.3).

3. Mobile Network
For mobile Network, they both have Quad Band GSM/EDGE UMTS, but G1 uses T-Mobile-only US 3G and iPhone uses AT&T-only US 3G.

4. Touch screen and input
About touch screen display, iPhone has Multi-touch 3.5 480*320 163 ppi, but G1 does not support mulit-touch. And in input aspect, G1 uses keyboard, Trackball, 6 buttons and touch screen, while iPhone has home button and multi touch screen.

5. Expansion
In expansion ports, G1 uses SD, ExtUSB(USB+audio) but iPhone has headphone, Dock connector (USB+ audio, video, remote). They have the same wireless WiFi 820.11b/g Limited Bluetooth 2.0 EDR.

6. Others
About hardware, the two phones perform almost the same and the only big difference is the iPhone uses multi-touch screen and G1’s camera is better than iPhone. And iPhone has a 1400Ah battery with 300 hours standby time but G1 only has a 1150Ah battery with 5 hours talk time and 130 standby.

Part 2: Software.

iPhone and G1 are both using Webkit as their browser engine. In media playback aspect, iPhone supports music, audiobook, video, streaming, downloads and rental, while for G1, only music playback. G1 has Android Market as its third party software store while iPhone has iPhone app store. G1’s platform is Modified Java development and iPhone uses Cocoa Touch.

Part 3: Their performance as media player.

G1 supports H.264, 3GPP, MPEG4, Codec 3GP video and MP3、AAC、AAC+、WMA、MPEG4、WAV、MIDI、REAL、AUDIO、OGG audio formats.
iPhone supports AAC,Protected AAC,MP3,MP3 VBR,Audible (formats 1, 2, 3), Apple Lossless, AIFF, WAV audio formats and H.264 (up to 1.5Mbps), MPEG-4 (up to 2.5Mbps) 640*480, 30fps, AAC-LC (up to 160 Kbps), 48kHz dimensional sound .m4v, .mp4 and .mov format.

Amazon MP3 Store allows you to download 6 million songs without the DRM protection, 89 cents per song. It is similar with the Apple iPhone, you need to pay for the video and audio sources on the Apple store. But how to get free sources for your G1.

For iPhone and G1 you can buy songs and videos from store, which is really expensive, and you can also make songs and videos for your iPhone and G1 by yourself, you just need to convert your DVDs and videos to mp4 format and then you can put them easily to your iPhone and G1.

Here I recommend you Aiseesoft DVD Converter Suite, it includes Best DVD Ripper, Total Video Converter and iPod to Computer Transfer.
For Mac user, I recommend you Aiseesoft DVD Converter Suite for Mac, it includes DVD Ripper for Mac and Total Video Converter for Mac.

2010年10月5日星期二

How to clone DVD to DVD folder for Mac

The DVD protection technology makes it dead difficult to clone DVD to DVD folder for Mac, since the protection of DVD must be removed, can you finish the task to clone DVD to DVD folder.

Aiseesoft DVD Copy for Mac is very useful, and simple to use to clone DVD Mac, But this software only suit for the Mac type computer. Go ahead and download this DVD Copy for Mac.

Buy NowFree trial(Intel PPC)

To see how the process of clone DVD to DVD folder for Mac, follows the following steps:

Select clone DVD Mode: Choose “Full Disc ” button or “Main Movie Mode” button according to your needs.

Select souce: Select DVD-video disc here to clone your DVD.

Choose target: Choose DVD folder to continue.

Start clone:Click”Start” to begin your DVD Clone Mac.

learn more on: how to edit DVD file with DVD Copy for Mac.

2010年10月4日星期一

How to Rip DVD, Convert Video to iPhone, backup iPhone info, make iPhone Ringone For Windows/Mac

Recently, iPhone has became a really important part of our life. People use it to make a phone call, enjoy music and movies/videos, and play games. Today I will share you a really nice software pack, which can convert DVD and video to iPhone video/audio formats, backup iPhone info on your computer, and make iPhone ringtone easily.

What you need is just this nice Convert DVD Video to iPhone software

iPhone Software Pack

Part 1: How to convert DVD movies to iPhone
Use Aiseesoft DVD to iPhone Converter.

DVD to iPhone Converter

Step 1: Load DVD
Put your DVD in your DVD Drive and click “Load DVD” button

Step 2: Choose output profile and Settings
You can choose your output profile in the drop-list when you click profile list.
You can also adjust your settings, such as Resolution, Bitrate, so on.

Step 3: Edit Video
You can do “Trim”, “Crop”, “Merge into one file”and other video editing functions to make your video more enjoyable.

Click “Start” to begin you conversion. After few mins you can enjoy your DVD movies on your iPhone.

Part 2: How to convert videos to iPhone with iPhone Movie Converter

iPhone Movie Converter

Step 1: Add file
Click “Add File” button to add your video you want to put on your iPhone.

Step 2: Choose output profile and settings
You can choose your output profile in the drop-list when you click profile list.
You can also adjust your settings, such as Resolution, Bitrate and Encoder and so on.

Step 3: Edit Video
You can do “Trim”, “Crop”, “Merge into one file”and other video editing functions to make your video more enjoyable.

Click “Start” to begin you conversion. After few mins you can enjoy your videos on your iPhone.

Part 3: How to transfer songs and vdieos from iPhone to computer, from computer to iPhone and from iPhone to iPhone.

iPhone Transfer

Step 1: Click iPhone Transfer
Click “Computer to iPhone”(1) button, it will allow you to transfer songs and videos from your computer to iPhone easily.
Click “iPhone to Computer”(2) button, it will allow you to backup your songs and videos from iPhone to your computer.
Click “iPhone to iPhone”(3) button, it will allow you to transfer songs and videos from one iPhone to another iPhone dirrectly.

Part 4: How to make your own iPhone ringtone

iPhone Ringtone Maker

Step 1: Click iPhone Rigntone Maker and click “Browse” on the right side of "Input File" to import the file that you want to make ringtone from i.t

Step 2: Play it and listen the music to find the segment that you want to use it as ringtone. Then drag and click the start& end slider to set your wanted segment, or type the start & end time in the corresponding text box directly to get the exact segment. You also can pre-listen the converted audio before generate.

Step 3: Click “Browse” on the right side of "Local Output Folder" to choose the output destination.

Step 4: Check "Export to iPhone" option, the converted ringtone will be load to your iPhone directly.

Step 5: After all the settings are finished, click “Generate” to begin making your own iPhone ringtone.

For Mac users I recommend you Aiseesoft iPhone Software Pack for Mac

Using Aiseesoft iPhone Software Pack for Mac, you can convert any video/DVD to iPhone Mac, backup the audio, video files on iPod to Mac and import audio, video files or folders from Mac to your iPod without iTunes with the help of iPod Manager Mac, even make iPhone ringtone from AVI, MPEG, WMV, MP4, FLV, MKV, H.264/MPEG-4, DivX, XviD, MOV, RM, RMVB, MP3, WMA, AAC video and audio sources on Mac.

iPhone Software Pack for Mac