2011年7月27日星期三

New Case Designs Revive Unlikely iPhone 5 Design


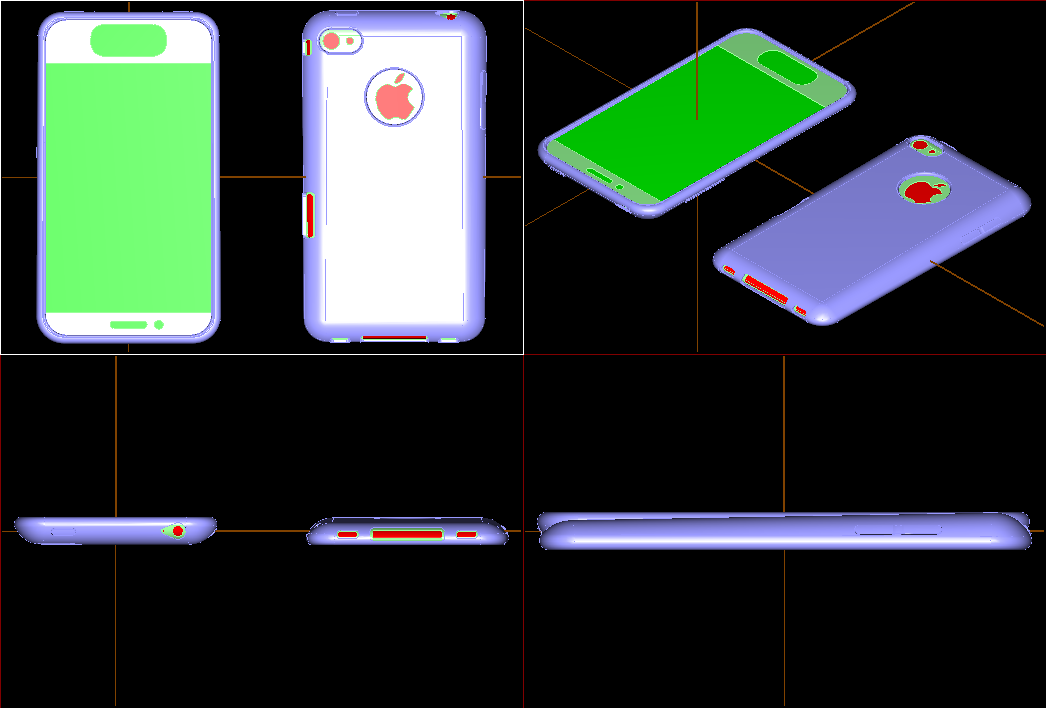
MobileFun.co.uk publishes two case designs that are claimed to be for the upcoming iPhone 5. The new designs seem to show that the iPhone 5 will carry a number of changes including a larger screen, curved/sloped back, and larger home button area.


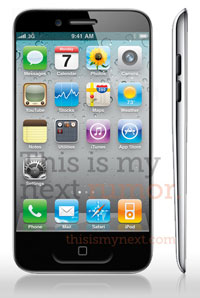
These design aspects were previously reported in April by ThisIsMyNext . Their report at the time claimed many of the same features:
Quote:
the home button is doing double duty as a gesture area; this falls in line with testing we've seen for gestures on the iPad, and our sources say that gestures are definitely coming in a future version of iOS. The home button will likely be enlarged, but not scrapped altogether. Furthermore, we're hearing that the screen on the device will occupy the entire (or near to it) front of the phone, meaning almost no bezel. Our source says the company is doing very "interesting things" with bonded glass technology, and has been exploring designs where the earpiece and sensors are somehow behind the screen itself, making for a device where the display is actually edge-to-edge.
The images do seem to be circulating from Chinese case manufacturers. The above image was posted by a Norwegian accessory manufacturer just the other day. This is the same image that MobileFun.co.uk also received and posted.

We suspect all of the images and information are coming from a common source, but we don't necessarily believe it to be true. At the time of ThisIsMyNext's posting, we received a reliable tip that this is not what the iPhone 5 will look like. As well, several other credible news outlets have said that the iPhone 5 will "look largely similar to the current iPhone 4".
From the first generation of iPhone on June 29, 2007 in USA to the lasted iPhone 3G S, iPhone have become an irreplaceable assistant of our daily life. We use iPhone to contact with friends, deal with Email, find information on the internet, watch youtube video, and so on. How to make your iPhone more enjoyable? Here I recommend you a really powerful iPhone software Pack. It can help you to put your DVD movies and videos you have one your iPhone, it can also backup your iPhone info, also it can make your own iPhone ringtone from your music and videos.

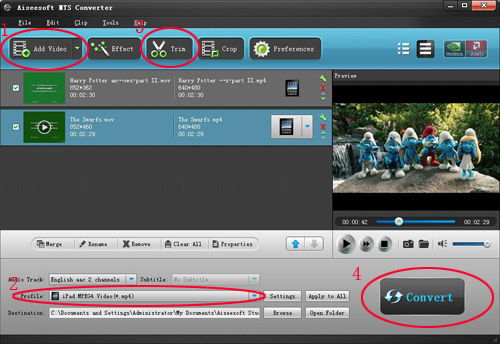
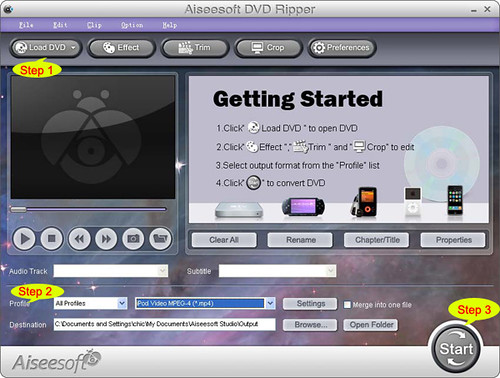
Part 1: How to convert your DVD movies to your iPhone use DVD to iPhone Converter
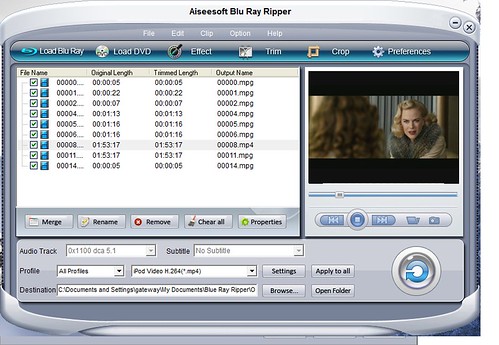
Step 1: Load DVD
Put your DVD in your DVD Drive and click “Load DVD” button

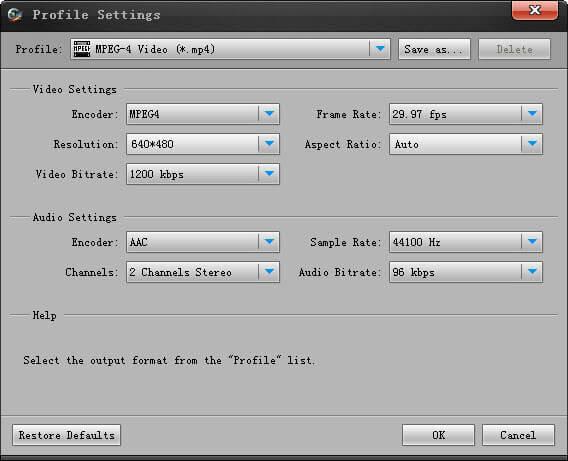
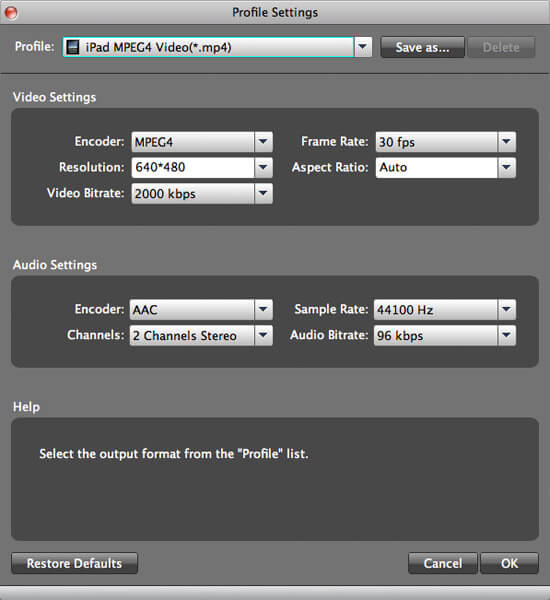
Step 2: Choose output profile and Settings
You can choose your output profile in the drop-list when you click profile list.
You can also adjust your settings, such as Resolution, Bitrate, so on.

Step 3: Edit Video
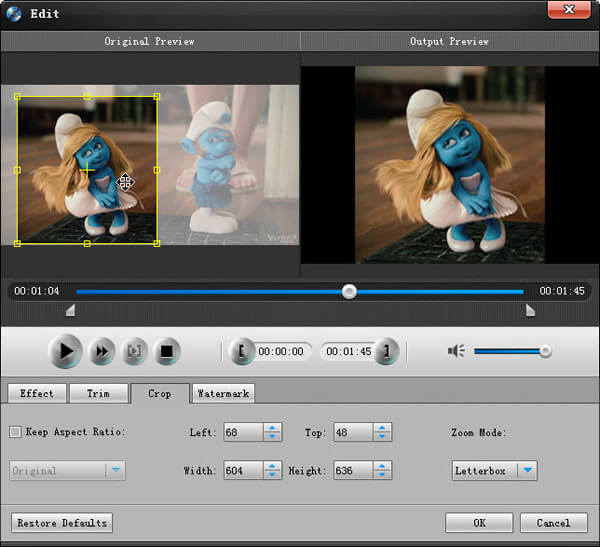
You can do “Trim”, “Crop”, “Merge into one file”and other video editing functions to make your video more enjoyable.

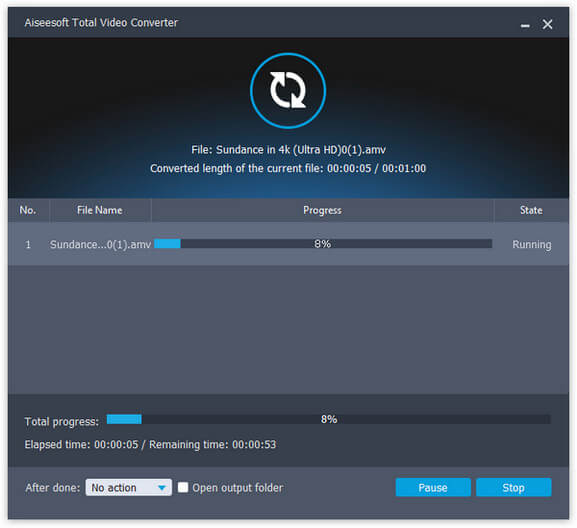
Click “Start” to begin you conversion. After few mins you can enjoy your DVD movies on your iPhone.

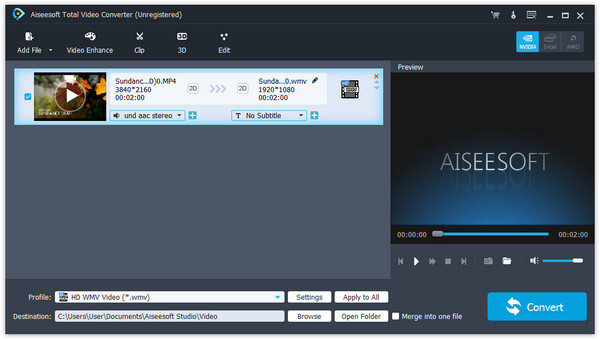
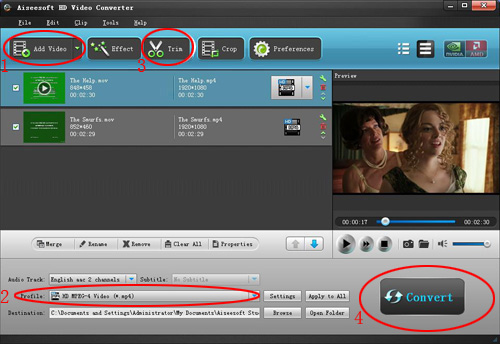
Part 2: How to Converter your videos to iPhone use iPhone video converter
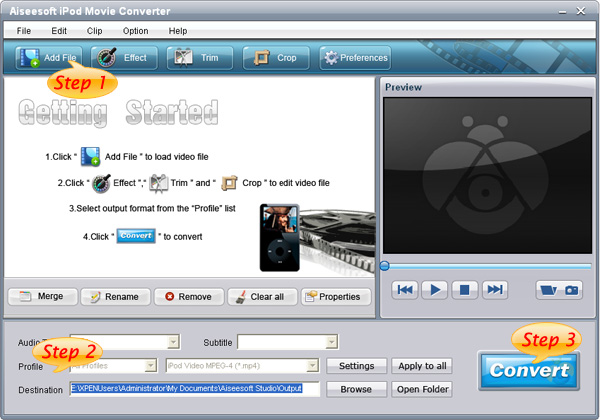
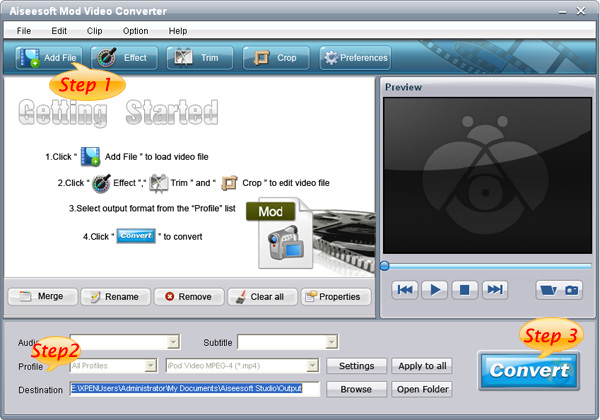
Step 1: Add file
Click “Add File” button to add your video you want to put on your iPhone.

Step 2: Choose output profile and settings
You can choose your output profile in the drop-list when you click profile list.
You can also adjust your settings, such as Resolution, Bitrate and Encoder and so on.

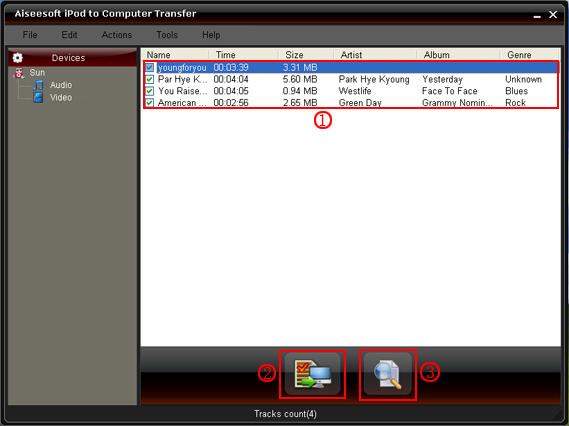
Part 3: How to transfer Backup iPhone info with iPhone Transfer

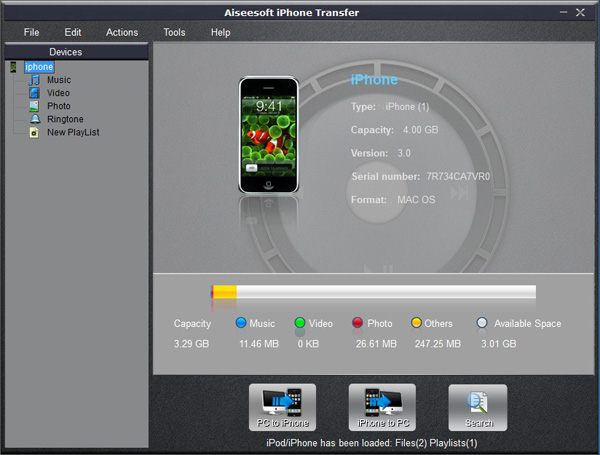
Step 1: Click iPhone Transfer
Click “Computer to iPhone”(1) button, it will allow you to transfer songs and videos from your computer to iPhone easily.
Click “iPhone to Computer”(2) button, it will allow you to backup your songs and videos from iPhone to your computer.
Click “iPhone to iPhone”(3) button, it will allow you to transfer songs and videos from one iPhone to another iPhone dirrectly.

Part 4: How to make your own iPhone ringtone

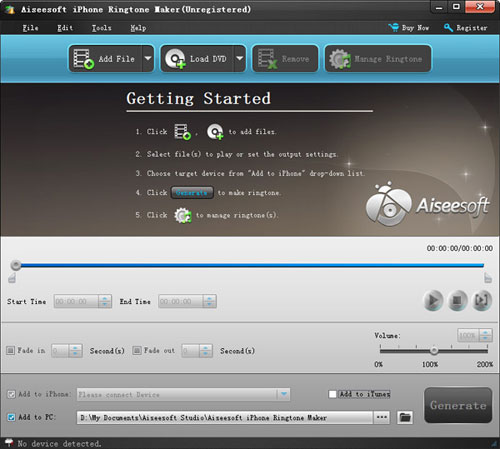
Step 1: Click iPhone Rigntone Maker and click “Browse” on the right side of "Input File" to import the file that you want to make ringtone from it.


Step 2: Play it and listen the music to find the segment that you want to use it as ringtone. Then drag and click the start & end slider to set your wanted segment, or type the start & end time in the corresponding text box directly to get the exact segment. You also can pre-listen the converted audio before generate.


Step 3: Click “Browse” on the right side of "Local Output Folder" to choose the output destination.


Step 4: Check "Export to iPhone" option, the converted ringtone will be load to your iPhone directly.


Step 5: After all the settings are finished, click “Generate” to begin making your own iPhone ringtone.

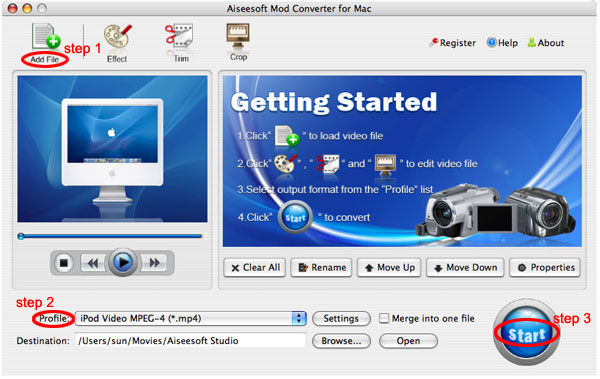
For Mac users I recommend you iPhone Software Pack for Mac

Functions:
1.Converter DVD to iPhone video format.
2.Converter Videos to iPhone video format.
3.Backup iPhone music and videos to your Mac
4.Make your own iPhone ringtone from your music and videos.

2011年7月26日星期二

How to convert mts/m2ts/ts video and put them into iPod?

As people have higher requirements about the quality of videos, more and more HD videos are emerging. And we come across a large number of HD videos in our daily life. Nevertheless, at the same time, these videos bring people many format troubles. Many people complain about the HD videos and the relevant converting issue, such as, what is HD, MTS format? Why do many people choose that format? How to convert the MTS, M2TS, and TS into the mp4 mpeg, mp3, etc? How to put the MTS and HD formats into iPod and iPhone?


Therefore, it is really necessary to read the following article that will answer all your questions, solve your problems. Most importantly, an ideal method will be offered to you.
High-definition video or HD video refers to any video system of higher resolution than standard-definition (SD) videos, and most commonly involves display resolutions of 1280×720 pixels (720p) or 1920×1080 pixels (1080i/1080p). By using the HD Camcorder, such as, Canon HR10 Camcorder, JVC Everio GZHD7 , Sony HDR-HC1 MiniDV, people can get extremely high quality videos. As the video you record on your camcorder is MTS, TS, M2TS or other HD video format which can not be accepted by some popular portable players, so you have to convert them into normal video format to edit. Here I am will willing to share with you
how to convert MTS, TS, M2TS video to normal video formats. The following are the excellent tools.

MTS Converter


Steps:
Step 1: Load Video
Click “Add File” to load the video that you want.
Step 2: Choose Your Output Profile and Settings
From “Profile” drop-down list you can choose your output profile according to your need.
For example, if you have a iPod and you want to convert video for it, you need to choose “iPod” from the profile list and then it also provides the second chance to specify your iPod generation.
Step 3: Video Editing
This powerful MTS Converter allows you to do many video editing.
Step 4: Conversion
After you have done all the steps above you can click “Start” button to start your conversion.

The excellent software with the similar function are :

M2TS Converter
HD Video Converter.

Well, if , you also want to put the transferred videos from your iPod to your computer or to your friend’s iPod , the iPod Transfer is the best choice for you . It can easily transfer data between my iPod and iPhone, backup iPod data in your computer and put songs and videos from your computer to iPod/iPhone without iTunes.

How to transfer songs and videos from iPod to your computer, from computer to iPod and from iPod to iPod.

Click “Computer to iPod” button, it will allow you to transfer songs and videos from your computer to iPod easily.

Click “iPod to Computer” button, it will allow you to backup your songs and videos from iPod to your computer.

Click “iPod to iPod” button, it will allow you to transfer songs and videos from one iPod to another iPod dirrectly.

2011年7月25日星期一

How to Backup iPod Files to PC or Mac

This guide aims to show you that how to backup your iPod songs and videos on your computer for Windows and Mac users.
It includes 2 parts:
Part 1: How to transfer iPod songs and videos to computer for Windows users
Part 2: How to transfer iPod songs and videos to Mac.

Part 1: How to transfer iPod songs and videos to computer for Windows users
Software Requirement: Aiseesoft iPod to Coumputer Transfer
It is a powerful iPod to computer transfer that can transfer all the iPod things to your computer; most importantly it supports all the iPods, from the oldest one to iPod nano-chromatic.

Step 1: Connect your iPod to your computer
When you plug your iPod into your computer, Aiseesoft iPod to Computer Transfer can automatically load your iPod into it.

Step 2: Choose songs
Choose the songs, videos, and other things that you want to backup at the top of the window. (1)


Step 3: The most important and the last thing you need to do are to click the “export to pc” button. (2).

After you click “export to pc” button a pop-up window will appear and with it you can choose where you place your iPod songs and videos.
Few seconds later you will have your iPod songs, videos and other things on your computer.

Part 2: How to transfer iPod songs and videos to Mac

Step 1: Download Aiseesoft iPod to Mac Transfer.
For Intel: http://www.aiseesoft.com/downloads/mac/ipod-to-mac-transfer-intel.dmg
For PPC: http://www.aiseesoft.com/downloads/mac/ipod-to-mac-transfer-power-pc.dmg
And install it.

Step 2: Plug your iPod to your Mac and run Aiseesoft iPod to Mac Transfer. It will find your iPod automatically.

Step 3: Just click Music and all of your music on your iPod will be listed, so you can pick up which songs you want to transfer. (Click “Video”/“Picture”, if you want to backup your videos and image.)
Step 4: Click “iPod to Mac” and few seconds later you will get your iPod songs on your Mac.

2011年7月24日星期日

How to convert DVD to iPod/iPhone/Sansa/PSP/Zune/iRiver/Google Phone/Cell Phone, etc. on Mac

Many people like enjoy movies at home and they have piles of DVDs. So do I. I like watch lastest movie on my new Mac and it is wonderful. However, I always break and lose my DVDs and I was really sad because they cost most of my money. Luckily, I find a way to store my DVD movies on my new Mac computer and evern put it on my iPod because I use a DVD Ripper for Mac and it can rip DVDs to so many video formats, such as AVI, MP4, MOV, MKV, WMV, DivX, XviD, MPEG-1/2, 3GP, 3G2, VOB and so on.

To do this you must have a nice dvd ripper for Mac. So I find Aiseesoft DVD Ripper for Mac

OK, let’s do it.
Step 1. Download and install Aisesoft DVD Ripper for Mac.

For Intel

For Power PC

Step 2. Load you DVD.
Click the “Load DVD” button(a), find the DVD folder of the movie you want to add from your DVD-ROM, and Click “Open”.


Tick the check boxes(b) before the titles and chapters that you want to rip.

Step 3. Chose output profile and settings.
Selecting output format is really easy, you can chose your output format according to your devices players and the default setting works great.

For a veteran of digital player, you could customize your own settings by clicking “Settings” button to chose your own video resolution, frame rate, bit rate, encoder, etc.

Tips: Sample rate (Hz) = any value up to 48000 (higher value = better sound quality = bigger file)
Bitrate (kbps) = any value up to 160 (higher value = better sound quality = bigger file)


After setting your own output and settings you can click “Start” button to start your conversion. (The time of the conversion depends on your DVD and the settings you chose.)

Do a few more clicks to make your movie more enjoyable.
1. Trim


If you want to rip only a part of the DVD movie, please click “Trim” button and drag the “Start trim slider” to set the start time and “End trim slider” to set the end time.(a). You can also do that by clicking the “Start trim button” and “End trim button”(b). The third way you do that is set the exact Start/End time at the right of the pop-up window and click “OK”.

2. Crop
If you want to remove the black edges or you want to rip a certain area of your video, please click the “Crop” button. You can do this either by drag the frame around the movie (a) or set the crop value: “Top, Left, Bottom, Right”.(b). Another way to do that is choose mode from “Crop Mode”(c).
Aiseesoft DVD Ripper for Mac also allows you to choose the output aspect ratio above the crop pane, “Keep Original, full screen, 16:9 and 4:3” are available.

3. Effect
If you want to adjust the effect of your movie, please click the “Effect” button and a pop-up effect window will appear. It allows you to edit your movie’s effect including “Brightness, Contrast, Hue, Saturation and Volume”.

4. Merge into one file/audio track/subtitles
If you would like to put several titles and chapters into one output file, please tick the check box of the “Merge into one file”.
You can choose audio track and subtitles you like according to what you prefer and the DVD supports.

Follow what I said above I hope you could enjoy your DVD movies on your Mac and also on your iPod and other portable players

2011年7月22日星期五

How to convert video for your Android phone?

Android phones, such as HTC, Motorola, Samsung, LG, Sony Ericsson, etc. are rapidly gaining in popularity these days. If you have got the Android phone and want to enjoy videos on your Android phone, you need the assistant of a professional video to Android phone converter. Aiseesoft total video converter is the ideal solution for converting all popular HD and general video files, such as H.264/ AVC, AVCHD, MTS, M2TS, TS, HD MKV, HD WMV, AVI, WMV, ASF, MKV, MOV, MPG, 3GP, 3GP2 and more, to your Android devices formats on your computer.

Note: For Mac users, please try Android Video Converter for Mac.

The following guide shows you how to convert video for popular Android phones, including HTC Legend, Motorola Droid, Samsung Galaxy, LG Ally and etc.

Step 1: Add video source

Load your videos by clicking the "Add Video" button. Also you can just drag and drop your video source to the Android Video Converter.

add video to android video converter

Aiseesoft Android Video Converter supports converting most popular video files, like MKV, WMV, AVI, FLV, 3GP, DivX, VOB and even HD video, to Android phone.

Step 2: Select the output format

Click the drop-down arrow on the right of the "Profile". There are several built-in profiles for popular devices. You can choose the output format according to your Android phone. Here we take MP4 as an example. You just need to choose the "Android > Android MP4 Video (*.mp4)" option.

choose MP4 for output android video

After selecting the target profile, you can also set some properties for special needs. Click the "Settings" button to do some further video and audio settings.

set output parameters

Step 3: Convert video to Android format

If you have done all these settings, just click "Convert" button to start converting your video to the Android format you select. And the converting progress will be finished within minutes.

convert video to android phone

Step 4: Import the output video to Android phone

Now, connect your Android mobile phone to computer and transfer the output videos to Android phone. Then you can enjoy the HD movies, popular TV shows and other interesting videos on your fancy Android phone.

Tips: This wonderful Android Phone Video Converter also possesses powerful video editing features. You can trim video segment, crop frame, join videos together, add watermark, and so on.

2011年7月21日星期四

iPod Converter Reviews: how to convert video for iPod, iPhone,iPhone Ringtone

As a crazy fan of iPod and iPhone, many friends come and ask me about how to enjoy movies and videos on their iPod and also they want unique ringtone for their iPhone. Too many people asking those questions, so I spend some time to make this article to show my dear friends that how to enjoy movies on iPod and iPhone and also how to make your own iPhone ringtone.

There are 3 parts in my article:
Part 1: How to put movie and videos on your iPod.
Part 2: How to put movie and videos on your iPhone
Part 3: How to make your own iPhone ringtone

Part 1: How to put movie and videos on your iPod.
If you want to put movie/video on your iPod, you must know what kind of video/movies can be played on your iPod. Look the following:

H.264
File formats: .m4v, .mp4, and .mov
Video: Up to 768 kbits/sec, 320 x 240, 30 frames per second (fps), Baseline Profile up to Level 1.3.
Audio: AAC-LC up to 160 kbits/sec, 48 Khz, and stereo audio.

MPEG-4
File formats: .m4v, .mp4, and .mov
Video: Up to 2.5 Mbits/sec, 480 x 480, 30 fps, Simple Profile.
Audio: AAC-LC up to 160 kbits/sec, 48 Khz, stereo audio.

Wow, that looks really complicated, right? Actually it is really easy to make such video/movie for you iPod. You just need Aiseesoft
iPod Movie Converter
.

Ok, let's begin.

Step 1. Load Video
Click “Add File” to load the video/movie that you want to put on your iPod.

Step 2. Choose Profile and Settings
You can choose your output profile on a drop-down list.
Click “Settings” button you can adjust the details of your output video/movie

Step 3. Conversion
Everything is ready and you just need to click “Start” button to begin the conversion.


Tips:
This powerful video convert for iPod allows you to do many video editing works to make your iPod video/movie more colorful.

1. Effect:
You can adjust your movie's effect, such as “Brightness”, “Contrast” and “Saturation”, and you can just check the output effect on the output preview window.
This powerful video converter allows you to choose “deinterlacing”.

2. Trim:
With trim function you can pick up any part of the video/movie to convert and put on your iPod.
There are 3 ways that you can trim your video.
a. You can drag the buttons to set the start and end time
b. You can preview the video first and when you want to start trim click the left one of the pair buttons when you want to end click the right one.
c. You can set the exact start and end time on the right side of the pop-up window.

3. Crop
Crop function allows you to pick up any play area to convert:
There are 2 ways that you can crop your video.
a. You can set your own mode on the bottom of the pop-up window
b. You can drag frame to set your own crop mode

In the Crop window, you can also choose your output “aspect ratio”.
Here it provides you 4 mode to choose: “keep original”, “full screen”, “16:9”, “4:3”

Part 2: How to put video/movie to iPhone
Actually, iPhone is much easier to deal with than iPod, because there are so many generations of iPod.
Put video/movie on iPhone, I use Aiseesoft iPhone Movie Converter.

Step 1. Load Video
Click “Add File” to load the video/movie that you want to put on your iPhone.

Step 2. Choose Profile and Settings
You can choose your output profile on a drop-down list.
Click “Settings” button you can adjust the details of your output video/movie

Step 3. Conversion
Everything is ready and you just need to click “Start” button to begin the conversion.

Aiseesoft iPhone Movie Converter can also do video editing works, such as adjust the effect, pick up any part of the movie, choose play area. The operation is the same as Part 1.

Part 3: How to make your own iPhone ringtone
This time you need Aiseesoft iPhone Ringotne Maker


Step 1: Click “Browse” on the right side of "Input File" to import the file that you want to make ringtone from it.

Step 2: Play it and listen the music to find the segment that you want to use it as ringtone. Then drag and click the start & end slider to set your wanted segment, or type the start & end time in the corresponding text box directly to get the exact segment. You also can pre-listen the converted audio before generate.

Step 3: Click “Browse” on the right side of "Local Output Folder" to choose the output destination.

Step 4: Check "Export to iPhone" option, the converted ringtone will be load to your iPhone directly.

Step 5: After all the settings are finished, click “Generate” to begin making your own iPhone ringtone.

Key function
● Convert any video to iPhone ringtone M4R
● Create iPhone ringtone from any audio files
● Get any clips from video and audio
● Edit Added iPhone ringtones
Using Aiseesoft iPhone Ringtone Maker, you are free to edit the added iPhone ringtone by removing it or renaming it directly.

2011年7月17日星期日

Top Five DVD to WMV Converters Reviews

WMV is a really popular video format, may video player can play .wmv video, such as GPhone, BlackBerry Storm, BlackBerry Bold, Palm Pre, Zune, Zune 2, PSP, PS3, Xbox 360 and so on. It is so popular, so what is wmv format, and how we can convert DVD and other video format to wmv format?

What is WMV video?
Developed and controlled by Microsoft, WMV stands for Widows Media Video. It is a generic name of Microsoft's video encoding solutions and doesn't necessarily define the technology what it uses.

Why we need to convert DVD to WMV?
Two reasons for this question. First, when we want to watch DVD movies on our portable video players and cell phones, we need to convert DVD to WMV. Second, when we try to put our DVD movies to windows movie maker to edit, we need to convert DVD to WMV.

What are the top DVD to WMV Converters on the market?
Top 1:
Aiseesoft DVD to WMV Converter.


Reviews:
Super fast conversion speed and incomparable output quality with a nice interface. Besides the great performance on conversion, the advantage of video editing function is really obvious. And it's price is reasonable.

Function:
Convert DVD to WMV, WMA, MP3 format.
Works perfectly with Zune, Gphone, Blackberry Strom, Blackberry Bold, Palm Pre, Xbox 360, PSP......
Choose subtitles and audio tracks.
Trim output video
Crop output video
Adjust the effect of the output video
Snapshot

Top 2:
4Videosoft DVD to WMV Converter

Reviews:
Conciseness of the interface with powerful conversion quality and outstanding speed. Also has video editing functions, trim, crop, merge and so on.

Function:
Convert DVD to WMV
Choose subtitles and audio tracks.
Trim, crop, merge output video
Adjust the effect of the output video
Save picture of the video

Top 3:
Cucusoft Ultimate DVD Converter

Reviews:
Powerful conversion function and fast speed. The only editing function is crop and also the interface is unconspicuous and a little wooden. The price is a little expensive.

Function:
Convert DVD to WMV
Choose subtitle and audio track
Crop output video


Top 4:
Aiseesoft DVD to WMV Converter for Mac


Reviews:
It is a really powerful Mac DVD to WMV converter. Outstanding conversion quality and speed, powerful video editing function with a gentle interface makes it the top 4 DVD to WMV Converter.

Function:
Convert DVD to WMV on Mac.
Support all devices
Trim, Crop, Merge output video
Adjust the Effect of the output video
Do snapshot

Top5.
Aiseesoft DVD Converter Suite

Reviews:
It easily convert DVD and video to all the popular formats, extract audio from DVD movie or video file and transfer songs and video from iPod/iPhone to PC.

Function:
Convert DVD and any video/audio to the various video/audio formats
Support almost all popular portable players
Transfer songs and video from iPod/iPhone to PC
Easy and powerful editing function (Merge, Trim, Crop)
Set video effect

2011年7月16日星期六

How to Rip Blu-ray Movies to MP4 Video Format?

If you want to convert Blu-ray to MP4 and enjoy the movie on your portable devices, Aiseesoft Blu-ray to MP4 Converter is definitely the best choice for you to convert any Blu-ray to MP4 formats with perfect quality and speed.

Aiseesoft Blu-ray to MP4 Converter is the best and easy-to-use BD to MP4 converting tool to help you convert any Blu-ray movie to MP4 format, which can be played on nearly portable media player, mobile phone and tablet computer.

This step-by-step guide will show you how to convert Blu-ray to MP4 with Aiseesoft Blu-ray to MP4 Converter

Step 1: Download and install Blu-ray to MP4 Converter

You need to download our software and install it on your computer. For Mac users, please visit: Blu-ray to MP4 Ripper for Mac

Step 2: Load Blu-ray disc

First, you need to insert your Blu-ray disc to BD drive. After launching the Blu-ray to MP4 Converter, you can click the "Load Blu-ray" button to input your Blu-ray movie.


Tips: this Blu-ray to MP4 Converter also supports converting DVD and popular videos to MP4.

Step 3: Edit Blu-ray movie

This is an optional step. This Blu-ray to MP4 Converter provides users with powerful video editing features. With it, you can trim video, crop video frame, add watermark to video, etc.


Step 4: Choose MP4 output format for Blu-ray

Click the "Profile" drop-down list and choose "General Video > MPEG-4 Video (*.mp4)".


Also you can click the "Settings" button to open "Profile Settings" window. You can adjust the output parameters like Video Resolution, Video Bitrate, Frame Rate, Encoder and Audio Channels, Sample Rate, Encoder, and Audio Bitrate.

Step 5: Start to convert Blu-ray to MP4

After all these steps above, you need to click the "Convert" button to let the software start converting Blu-ray disc to MP4 format. You can track the ripping process from the progress bar.


After a few minutes or hours, you will get your desired MP4 video. Then you can enjoy it on your portable devices on the go.

Blu-ray Ripper

2011年7月14日星期四

How to Rip DVD(windows/mac), Copy DVD, Convert Video?

Every year, my family will have a big party and all the members will get together. We have a very nice time on each year's party. And from the year 2000, I record the party and share with my family. I enjoy the work very much, while when I share the video or the DVD, it is really a big problem. But now I can solve it with only a few clicks.

So I write this article to show you guys how to deal with dvd and video stuff.

Part 1: How to Rip DVD on Windows and Mac

First Let me explain what is rip DVD. When I talk about “Rip DVD”, it means I will convert DVD video/movie to video format and you can play the video/movie without the disc. Of course, the original DVD will not be hurt.

For Windows users:
You need a DVD Ripper.


Step 1: Load your DVD to it
Step 2: Choose output profile
Step 3: Start Conversion


For Mac users:
Step 1: Download DVD Ripper for Mac.


Step 2: Load you DVD
Step 3: Choose output profile
Step 4: Start Conversion


Part 2: How to Copy DVD video/movie to another DVD Disc
To Copy a DVD to a blank DVD Disc you need a DVD copy Software and a DVD +/- RW Drive and a blank DVD Disc.


Step 1. Choose Source:
The source of this DVD Copy software can be: DVD disc, ISO image file and DVD folder
Step 2. Preparation
Before you click the “Start” button,
1. You can choose to copy the full disc or the main movie.
2. You can choose the audio, subtitle of the copy.
3. You can change the name of the volume.
4. You can choose to “include menu” or “skip menu” or neither of them.
Step 3. Choose Target:
You can copy your source to 3 target: DVD disc, ISO image and DVD folder
Step 4: Start Copy

Part 3: How to Convert Video
Here you need a Video Converter to help you.

Step 1: Add Video
Step 2: Choose output profile
Step 3: Start Conversion

2011年7月13日星期三

How to convert and edit HD video

Because of the widely using of HD Camcorder, now it is really convenient to record family parties and other things you are interested in. Nowadays, people would like to share their things with the rest of the world through Internet, such as youtube.com and other video websites.

This guide aims to show you how to convert and edit the video you recorded using your HD camcorder
What you need is a powerful HD Video Converter.

Step 1: Load Video
Click “Add File” to load the video that you want to convert.


Step 2: Choose Your Output Profile and Settings.
From “Profile” drop-down list you can choose your output profile according to your need.
You can also click “setteing”adjust the settings of your output video, such as “video/audio encoder”, “Video/audio Bitrate”, “Channels”, “Resolution” and so on..
Step 3: Video Editing.
This powerful MTS Converter allows you to do many video editings.
1. Click "Effect". to make special effect for your movie.
You can adjust the “Brightness”, “Contrast”, “Saturation” and also you can use “deinterlacing” to improve you output effect.

2. Trim: .
“Trim” function allows you to pick up any part of your video to convert. You can just convert a part of your video that you want.

3: Crop: .
Cut off the black edges of the original movie video and watch in full screen on your iPod using the "Crop" function.

Step 4: Conversion.
After you have done all the steps above you can click “Start” button to start your conversion.

Here I also recommend you some High Definition video converter, MTS Converter, TS Video Converter.

2011年7月12日星期二

How to convert mod to wmv/avi/mp4/mov/mpg for Mac/Windows

Nowdays, more and more people use camcorder to record something happy, such as birthday party, wedding, graduation etc. While, maybe lots of you aren’t familiar with these tools, feeling frustrated about how to convert and import properly those .MOD video files. Now here, I give some little tips and hope it useful to all of you.

First, what’s Mod?

.Mod files are actually MPEG-2 files with AC3 audio, similar to a VOB file on a DVD or the M2T files used on Sony hard drive camcorders, this video file format is used on many digital camcorders, such as the JVC Everio, the Canon FS100 and the Panasonic D-Snap SD-card camcorders.

Second, why and how we convert them to what we wanted video formats?

Because .Mod file is not supported by iPod Touch, iPod Nano, iPod Classic, iPhone, Apple TV, PSP, Zune, Creative Zen etc, so if you want to import MOD files from your camcorders to play on iPod, even burn to DVD to keep them, you have to convert them.
Here, I’ll share you with a useful tool to solve this problem.
Part one: For Mac users:

Aiseesoft Mod Converter for Mac can help you convert Panasonic/JVC/Cannon etc. Mod file to AVI, convert Mod to FLV, MPG, MP4, MOV, FLV, 3GP, etc., then you can enjoy edit them, enjoy them on your portable devices.

Now, follow the step-by-step guide and start the conversion.

Step 0: Download, install and run Aiseesoft Mod Converter for Mac
And after a while, you can see the following inferface:


Step 1: Load Video:
Click “Add File” button to browse your computer hard disc and load the MOD/TOD video files you want to convert to the software

Step 2: Set output video format
Click “Profile” button from the drop-down list to select the output video format such as AVI, MPG, MPEG and WMV. You can click the “Settings” button to set parameters of your output video such as Frame Rate, Bitrate to get the best video quality as you want.

Step 3: Click the “Start” button to start the conversion.

Tips:
This Mac Mod Converter also provides you with a series of video editing functions, such as crop video size, trim a clip of video, and merge several videos, set video effect.

1. Click "Effect" to make special effect for your movie.

You can adjust the “Brightness”, “Contrast”, “Saturation” and also you can use “deinterlacing” to improve you output effect.

2. Trim:
“Trim” function allows you to pick up any part of your video to convert. You can just convert a part of your video that you want.

3: Crop:
Cut off the black edges of the original movie video and watch in full screen on your iPod using the "Crop" function.

4. Merge into one file
If you want to merge several Mod/Tod videos into one file you can choose them and click the “Merge into one file” to do it

Part two: For windows users:

Aiseesoft Mod Converter has the same function

Step 0: Download, install and run Aiseesoft Mod Converter


Step 1: Click “Add File” button to add your video files
Step 2: Set output video format
Step 3: Click the “Start” button to start the conversion.


Tips:
This powerful Mod Converter also allows you to do many editing works, such as “Trim”, “Crop” and “Effect”

After you convert MOD/TOD Video files with Aiseesoft Mod Converter, you can import MOD Movie from your camcorders to Windows Movie Maker, iPod, Zune, etc without problem.

2011年7月11日星期一

Top Five DVD to WMV Converters Reviews

WMV is a really popular video format, may video player can play .wmv video, such as GPhone, BlackBerry Storm, BlackBerry Bold, Palm Pre, Zune, Zune 2, PSP, PS3, Xbox 360 and so on. It is so popular, so what is wmv format, and how we can convert DVD and other video format to wmv format?

What is WMV video?
Developed and controlled by Microsoft, WMV stands for Widows Media Video. It is a generic name of Microsoft's video encoding solutions and doesn't necessarily define the technology what it uses.

Why we need to convert DVD to WMV?
Two reasons for this question. First, when we want to watch DVD movies on our portable video players and cell phones, we need to convert DVD to WMV. Second, when we try to put our DVD movies to windows movie maker to edit, we need to convert DVD to WMV.

What are the top DVD to WMV Converters on the market?
Top 1:
Aiseesoft DVD to WMV Converter.


Reviews:
Super fast conversion speed and incomparable output quality with a nice interface. Besides the great performance on conversion, the advantage of video editing function is really obvious. And it's price is reasonable.

Function:
Convert DVD to WMV, WMA, MP3 format.
Works perfectly with Zune, Gphone, Blackberry Strom, Blackberry Bold, Palm Pre, Xbox 360, PSP......
Choose subtitles and audio tracks.
Trim output video
Crop output video
Adjust the effect of the output video
Snapshot

Top 2:
4Videosoft DVD to WMV Converter

Reviews:
Conciseness of the interface with powerful conversion quality and outstanding speed. Also has video editing functions, trim, crop, merge and so on.

Function:
Convert DVD to WMV
Choose subtitles and audio tracks.
Trim, crop, merge output video
Adjust the effect of the output video
Save picture of the video

Top 3:
Cucusoft Ultimate DVD Converter

Reviews:
Powerful conversion function and fast speed. The only editing function is crop and also the interface is unconspicuous and a little wooden. The price is a little expensive.

Function:
Convert DVD to WMV
Choose subtitle and audio track
Crop output video


Top 4:
Aiseesoft DVD to WMV Converter for Mac


Reviews:
It is a really powerful Mac DVD to WMV converter. Outstanding conversion quality and speed, powerful video editing function with a gentle interface makes it the top 4 DVD to WMV Converter.

Function:
Convert DVD to WMV on Mac.
Support all devices
Trim, Crop, Merge output video
Adjust the Effect of the output video
Do snapshot

Top5.
Aiseesoft DVD Converter Suite

Reviews:
It easily convert DVD and video to all the popular formats, extract audio from DVD movie or video file and transfer songs and video from iPod/iPhone to PC.

Function:
Convert DVD and any video/audio to the various video/audio formats
Support almost all popular portable players
Transfer songs and video from iPod/iPhone to PC
Easy and powerful editing function (Merge, Trim, Crop)
Set video effect

2011年7月10日星期日

Time to Throw Away Your iTunes

Everyone who has a iPhone or iPod is using itunes definitely. However, does everyone like it? Does everyone think it is convenient? Does everyone really want to use it if they have a substitute that is more easier to use and can do much more for your iPhone and iPod? I think everyone wants to replace it because it has too many limitations and it serves apple but not people who has a iPhone or iPod. Now it is the time to throw away your itunes. Because you have this iPhone transfer and iPod transfer.

This powerful iPhone Transfer can help you to import songs/videos/images from your computer to iPhone. It can also backup your iPhone music/videos/images to your computer or external hard dirve. Most important, it can help you to put your DVD movies and videos/movies you download from internet and the format is not supported by iPhone to iPhone easily. It can also help you to make iPhone rigntones for iPhone users from video/dvd/music they have.
OK, only from what I said you may not fall in love with it immediately. Let's see how it works for you.

Part 1: How to Import DVD Movies/Videos/Songs/Images to iPhone
Step 1: Connect iPhone

Plug your iPhone to your computer via USB cable, it can automatically find your iPhone, load your iPhone info and show the info at the left of its interface. (It works the same as itunes.)


Step 2: Import to iPhone
A. Import DVD movies to iPhone (iTunes does not allow you to do this)


1.Select “Movie” in the left list and then click “PC to iPhone” button at the bottom of the interface, you will see a conversion and import window.
2.Put your DVD movies in your DVD Drive and Click “Load DVD” button to load the movies.
3.You can choose “Audio track” and “Subtitles” of the output movies, if you do not want a subtitle just leave it blank. You need also select the output profile and you can select apply to all button to use this output profile forever, if you do not use it some day, you can change it at will.
4.Click “Import” button and it will help you to convert the movies to iPhone video format and then import into your iPhone directly.

Note:
You need to check the box before “convert files before importing”, if not the movies/videos/songs can not be recognized by iPhone and can not be played in iPhone.

B. Import videos/songs to iPhone (iTunes only import certain format videos/songs to iPhone)


1. Select “Video” or “Music” in the left list and then click “PC to iPhone” button and go to the conversion and import window
2. Click “Add File” button to add the video or music to it and you can choose output profile and then click “import” button
Note:
If the videos and songs' format is not supported by iPhone, this powerful iPhone transfer will convert them first and then transfer them into your iPhone. If you have lots of videos or songs it may take longer to transfer them to your iPhone.

C. Import photo/images to iPhone
The process of importing images to iPhone is the same as videos/songs. First you need to select photo in the left list. Second you can select photos to import to your iPhone.


Note:
If you import a photo you do not want to you iPhone, you can right click the selected photo and then delete it from iPhone directly.

D. Import and Create Ringotnes to iPhone (iTunes can only import but not create)

1.Select Ringtone on the left list
2.Click “PC to iPhone” button and you will go to the make ringtone and import window.
3.Here this powerful iPhone transfer allows you to create ringtones for iPhone from DVD/Movie/Video/Music.
4.After you load a video, music or a DVD, you can pick up one part of it as your ringtone. You can pre-listen the ringtone. If not satisfied, change it and re-prelisten it.
5.After you find your right part as your ringtone, click “import” button. It will generate your ringtone and then import to your iPhone directly.

Part 2: How to Backup your iPhone Music/Images/Videos on Computer(iTunes does not allow you to do backup, NEVER!)
Run the software, and connect your iPhone/iPod to your computer via USB cable. After done, the iPhone/iPod icon and its library and playlists will appear in the Device list.

Step 1: Open the library/playlist that you want to export files, and then check the file(s) you want to export in the file list.

Step 2: Click “iPhone to PC” button to select the destination of the exporting files and start exporting files.

OK, you can throw away your itunes NOW!

If you are a Mac user, here are also a realy niceiPhone Transfer for Mac, it can do the same thing as the windows version.
Transfer DVD/Movies/Video/Songs/Images to your iPhone and backup Music, Video, Ringtones, and images to your Mac easily.

Also there is iPod Manager for Mac for Mac users. It has the same function as the iPhone transfer for mac.

2011年7月8日星期五

How to watch Blu-ray movies with WD TV Live HD Media Player?

WD TV Live HD Media Player comes on to provide you with easy ways to get digital content from PCs to your TVs. It has everything you need to play your HD media collection on your HDTV, because it supports a wide variety of file types. However, this WD TV Live cannot do anything about watching your Blu-ray movies. So you need a professional Blu-ray to WD TV Live Ripper to help you enjoy the Blu-ray movies on your HDTV.

Now, I will show you how to watch Blu-ray movies with WD TV Live on your HDTV.

First, you need to download the Blu-ray Ripper for Mac and install it on your Mac.

Step 1: Load your Blu-ray disc

After running the software, you can click the "Load Blu-ray" button to input your source Blu-ray disc.

Step 2: Choose output profiles

Click on the "Profile" drop-down list to choose output formats for the output video. The WD TV Live supports many popular video formats, so you can choose your preferred one as you want. Here, we take the "HD H.264/MPEG-4 AVC Video (*.mp4)" for example.

Step 3: Adjust video and audio settings

This Mac Blu-ray to WD TV Live Converter allows users to adjust video and audio parameters to customize the output file quality for WD TV HD Media player. Click "Settings" button and then you can adjust Video Encoder, Frame Rate, Video Bitrate, Audio Encoder, Sample Rate, Channel, and Audio Bitrate.

Step 4: Start ripping Blu-ray to WD TV Live format on Mac

Click the "Convert" button at the lower right corner of the interface to rip/convert Blu-ray movies to WD TV Live HD Media Player. Once the conversion is done, you are able to get the resulted "HD H.264/MPEG-4 AVC Video (*.mp4)" video. Now, you just need to connect your USB drive to your Mac and transfer the output video to the drive.

Step 5: Connect WD TV Live to your HDTV

Connect the WD TV Live to your HDTV. And you can choose the HDMI connection or component connection.

Step 6: Connect portable hard drive to WD TV Live

Just connect your USB drive to your WD TV HD Media Player, and the media play will scan the USB drive for media files. When the USB drive is detected, you are able to play back Blu-ray movies with WD TV HD Media Player.

2011年7月7日星期四

iPad 3 Coming This Year With 2560x1920 Resolution Display?

Buried in a Reuters report this evening about the imminent launch of the MacBook Air, there was a single sentence nonchalantly stating that the iPad 3 would launch in the fourth quarter of this year with a screen resolution "5-6 times" higher than the iPad 2.

The numbers seemed absurd so we tracked down the original Economic Daily News report which only made it sound slightly less unbelievable. Thanks to translation assistance from @wayyuen, @wongwil, @agleung and Micah Fisher-Kirshner, here's the relevant portion in English:

Apple dominates the tablet computer market in the year of 2010; In 2011, a huge number of tablet computers have been introduced and given a general threat to Apple's leading status, Apple is thinking to give an aggressive counteroffensive.
....
Apple, in order to maintain a leading position, plans to launch iPad 3 in the fourth quarter by shortening the iPad Product life cycle. And also, try to push the screen resolution of iPad 3 to 2560x1920 , which is the ultimate resolution a 9.7 Inch Panel can achieve and doubles "Full HD".

The reasoning behind a second iPad update in 2011 is that Apple's competitors have been purely reacting to the launch of the iPad 2, and while they are ramping up their launches for later this year, Apple plans to trump them again by launching the iPad 3 quickly.


While we might have just dismissed the report in its entirety, this actually isn't the first time we've heard this line of reasoning. In February before the launch of the iPad 2, both DaringFireball and TechCrunch seemed to believe that Apple would make such a move. DaringFireball wrote at that time:

Thus, my gut feeling is that Apple will move the iPad to a September release schedule, alongside the iPods. But they wouldn't want to wait over a year and a half from the announcement of the original iPad to announce the second one -- not with these stakes, and not with so many serious competitors trying their best to catch up.

Perhaps the most unbelievable part of the story, however, is that Apple might try to reach a resolution of 2560x1920 in the new device. That resolution would be over 6x the number of pixels of the current iPad, and 2.5x the linear resolution in each dimension. The closest display we've heard of is Samsung's of a 2560x1600 10.1" LCD display in May. Apple has been rumored to be bringing a "Retina" display to the iPad 3, though there has been little talk of it recently. To further add to the doubts, seem to be expecting the iPad 3 to arrive in 2012.

Economic Daily Times has been a spotty source of Apple rumors, so we don't have much confidence in this report, but felt it an interesting discussion piece given the previous "iPad 3 in 2011" rumors.

DVD to iPad 2 Converter

iPad 2 Video Converter

2011年7月5日星期二

Time to Throw Away Your iTunes

Everyone who has a iPhone or iPod is using itunes definitely. However, does everyone like it? Does everyone think it is convenient? Does everyone really want to use it if they have a substitute that is more easier to use and can do much more for your iPhone and iPod? I think everyone wants to replace it because it has too many limitations and it serves apple but not people who has a iPhone or iPod. Now it is the time to throw away your itunes. Because you have this iPhone transfer and iPod transfer.

This powerful iPhone Transfer can help you to import songs/videos/images from your computer to iPhone. It can also backup your iPhone music/videos/images to your computer or external hard dirve. Most important, it can help you to put your DVD movies and videos/movies you download from internet and the format is not supported by iPhone to iPhone easily. It can also help you to make iPhone rigntones for iPhone users from video/dvd/music they have.
OK, only from what I said you may not fall in love with it immediately. Let's see how it works for you.

Part 1: How to Import DVD Movies/Videos/Songs/Images to iPhone
Step 1: Connect iPhone

Plug your iPhone to your computer via USB cable, it can automatically find your iPhone, load your iPhone info and show the info at the left of its interface. (It works the same as itunes.)


Step 2: Import to iPhone
A. Import DVD movies to iPhone (iTunes does not allow you to do this)


1.Select “Movie” in the left list and then click “PC to iPhone” button at the bottom of the interface, you will see a conversion and import window.
2.Put your DVD movies in your DVD Drive and Click “Load DVD” button to load the movies.
3.You can choose “Audio track” and “Subtitles” of the output movies, if you do not want a subtitle just leave it blank. You need also select the output profile and you can select apply to all button to use this output profile forever, if you do not use it some day, you can change it at will.
4.Click “Import” button and it will help you to convert the movies to iPhone video format and then import into your iPhone directly.

Note:
You need to check the box before “convert files before importing”, if not the movies/videos/songs can not be recognized by iPhone and can not be played in iPhone.

B. Import videos/songs to iPhone (iTunes only import certain format videos/songs to iPhone)

1. Select “Video” or “Music” in the left list and then click “PC to iPhone” button and go to the conversion and import window
2. Click “Add File” button to add the video or music to it and you can choose output profile and then click “import” button
Note:
If the videos and songs' format is not supported by iPhone, this powerful iPhone transfer will convert them first and then transfer them into your iPhone. If you have lots of videos or songs it may take longer to transfer them to your iPhone.

C. Import photo/images to iPhone
The process of importing images to iPhone is the same as videos/songs. First you need to select photo in the left list. Second you can select photos to import to your iPhone.

Note:
If you import a photo you do not want to you iPhone, you can right click the selected photo and then delete it from iPhone directly.

D. Import and Create Ringotnes to iPhone (iTunes can only import but not create)

1.Select Ringtone on the left list
2.Click “PC to iPhone” button and you will go to the make ringtone and import window.
3.Here this powerful iPhone transfer allows you to create ringtones for iPhone from DVD/Movie/Video/Music.
4.After you load a video, music or a DVD, you can pick up one part of it as your ringtone. You can pre-listen the ringtone. If not satisfied, change it and re-prelisten it.
5.After you find your right part as your ringtone, click “import” button. It will generate your ringtone and then import to your iPhone directly.

Part 2: How to Backup your iPhone Music/Images/Videos on Computer(iTunes does not allow you to do backup, NEVER!)
Run the software, and connect your iPhone/iPod to your computer via USB cable. After done, the iPhone/iPod icon and its library and playlists will appear in the Device list.

Step 1: Open the library/playlist that you want to export files, and then check the file(s) you want to export in the file list.

Step 2: Click “iPhone to PC” button to select the destination of the exporting files and start exporting files.

OK, you can throw away your itunes NOW!

If you are a Mac user, here are also a realy niceiPhone Transfer for Mac, it can do the same thing as the windows version.
Transfer DVD/Movies/Video/Songs/Images to your iPhone and backup Music, Video, Ringtones, and images to your Mac easily.

Also there is iPod Manager for Mac for Mac users. It has the same function as the iPhone transfer for mac.

2011年7月3日星期日

How to Rip Blu-Ray DVD and Common DVD with Only One Ripper

So, with the growth in living standard, people pay more attention on relaxing themselves on spare time. Now the Blu-ray movie is a nice choice. But you cannot bring your DVD player with you anywhere, so put the movie on your PMP or Laptop or iPad is the best choice.

What is Blu-Ray DVD?
Blu-ray Disc (BD), sometimes called "Blu-ray," is an optical disc storage medium designed to supersede the standard DVD format. Its main uses are for storing high-definition video, PlayStation 3 video games, and other data, with up to 25 GB per single layered, and 50 GB per dual layered disc. The disc has the same physical dimensions as standard DVDs and CDs.

What is the different between the DVD and Blu-Ray DVD?
To be simple, Blu-Ray DVD uses a blue-violet laser as opposed to the red laser used on DVDs and it can hold a lot more information on them than DVDs, 25GB (single-layer)/50GB (dual-layer) but DVD and only take 4.7GB (single-layer)/8.5GB (dual-layer).

The images on blu-ray disc are sharper, brighter, and more detailed than any DVD movie. What manufacturers are trying to do is to make the movie look as close to what you see in a real theater as possible, except for its a tenth the size and in your home. Blu-Ray DVD is really nice but you have to play it on Blu-Ray player.

Part 1: How to Rip Blu-Ray DVD to Video Format?

Tools you need:

1. Blu-Ray DVD Driver
2.Blu Ray Ripper
Preparation:
You need install and run this Blu Ray Ripper


Step 1: Load your BD
Load your BD disc in to your blu-ray driver.
Step 2: Output Profile
Choose your output profile from the drop-down list according to your need. You choose output format as your devices and also with specific video format.
You can also set the specific settings of your output video, such as “resolution” “video bitrates” “encoder” and so on.

After you have done all the tings above, you need to click the start button to convert your blu-ray disc.

Tips:
You can also do many video editing works about your output video.

1. Effect:
You can adjust the “Brightness”, “Contrast”, “Saturation” of your output video and also you can select to use the “deinterlacing” function which make your video more enjoyable.
2. Trim
To pick up any part of your BD movie to converter, you can use “Trim” function.
3. Crop
You can choose any play area to convert by using the Crop function.
4. Watermark
You can add your own watermark on the output video, the watermark can be words and also picture. You can choose the font of your words and other really enjoyable function

Part 2: How to Rip Standard DVD to Video Format?

Step 1: Load your DVD
Put your DVD to your DVD Driver

Step 2: Choose your output profile
Choose your output video format according to your need.

Step 3: Video effects
You can do many video editing works with this really nice dvd ripping software. Such as trim, crop, merge and also you can add water mark to your output video.

Step 4: Conversion
Click the “Start” button to begin to rip your DVD.

Note:If you have want to put blu-ray DVD movies on your iPad, you can use Aiseesoft Blu-Ray to iPad Ripper. It can rip Blu-ray DVD movies to MPEG-4, H.264/MPEG-4 AVC, MOV and M4v, etc. for iPad.

2011年7月1日星期五

How to rip/convert Blu-ray movie to Galaxy Tab?

As the Samsung Galaxy Tab has no Blu-ray driver, you need to rip Blu-ray movie to Galaxy Tab video file to enjoy. Aiseesoft Blu-ray Ripper is the perfect Blu-ray movie to Galaxy Tab Ripper. It can help users convert any Blu-ray disc with outstanding output video quality.

Step 1: Install Blu-ray to Galaxy Tab Ripper

You can download the Blu-ray movie to Galaxy Tab Ripper and install it. Then you can rip any Blu-ray disc to Galaxy Tab.

Step 2: Load Blu-ray movie

Click the "Load Blu-ray" button to input the Blu-ray movie. Besides of the Blu-ray disc, this Blu-ray to Galaxy Tab Ripper also allows users to input general DVD and video files.

Step 3: Edit Blu-ray movie effect

Aiseesoft Blu-ray to Galaxy Tab Ripper owns powerful video editing functions, such as trimming video length, cropping and watermarking video frame, merging video clips, and modifying video effect. With all these wonderful editing features, you can get customized output video effect.

Step 4: Audio track and subtitle

If the Blu-ray disc provides several audio tracks and subtitles, you can choose one from the drop-down list. Also you can do some further settings by clicking the "Settings" button.

Step 5: Output profile

Click the "Profile" drop-down list to choose output format. The Samsung Galaxy Tab supports Adobe Flash 10.1, DivX, MPEG-4, WMV and Xvid, H.263, H.264, etc.