2011年8月28日星期日

Best iPad Converter Reviews

All of us who have got iPad are looking for best and easy converter programs with the enjoyment of iPad miracle. In this way it will become more convenient to enjoy music, movie video and ebook, etc.. I found several programs that are really easy to use.
No. 1 iPad Converter Suite
iPad Converter Suite is the first choice for all because it can rip DVD, convert video to iPad and transfer files from iPad to computer. Only program can do almost all things.


No. 2 Free iPad Video Converter
iPad Video Converter is a wonderful simple and easy iPad video converter. It can convert almost all video formats to iPad which lets you enjoy watching any video on your iPad anywhere and anytime.

No. 3 DVD to iPad Converter
DVD to iPad Converter is mainly to rip DVD for iPad to MPEG, MP4, AVI, WMV, RM, DivX etc..
In addition, these programs above are good video editor. They can trim, crop and add watermark to video. All are so easy to meet your requirement.


2011年8月27日星期六

How to Rip DVD(windows/mac), Copy DVD, Convert Video?

Every year, my family will have a big party and all the members will get together. We have a very nice time on each year's party. And from the year 2000, I record the party and share with my family. I enjoy the work very much, while when I share the video or the DVD, it is really a big problem. But now I can solve it with only a few clicks.

So I write this article to show you guys how to deal with dvd and video stuff.

Part 1: How to Rip DVD on Windows and Mac

First Let me explain what is rip DVD. When I talk about “Rip DVD”, it means I will convert DVD video/movie to video format and you can play the video/movie without the disc. Of course, the original DVD will not be hurt.

For Windows users:
You need a DVD Ripper.


Step 1: Load your DVD to it
Step 2: Choose output profile
Step 3: Start Conversion


For Mac users:
Step 1: Download DVD Ripper for Mac.


Step 2: Load you DVD
Step 3: Choose output profile
Step 4: Start Conversion


Part 2: How to Copy DVD video/movie to another DVD Disc
To Copy a DVD to a blank DVD Disc you need a DVD copy Software and a DVD +/- RW Drive and a blank DVD Disc.


Step 1. Choose Source:
The source of this DVD Copy software can be: DVD disc, ISO image file and DVD folder
Step 2. Preparation
Before you click the “Start” button,
1. You can choose to copy the full disc or the main movie.
2. You can choose the audio, subtitle of the copy.
3. You can change the name of the volume.
4. You can choose to “include menu” or “skip menu” or neither of them.
Step 3. Choose Target:
You can copy your source to 3 target: DVD disc, ISO image and DVD folder
Step 4: Start Copy

Part 3: How to Convert Video
Here you need a Video Converter to help you.

Step 1: Add Video
Step 2: Choose output profile
Step 3: Start Conversion

2011年8月26日星期五

How to rip and convert Blu-ray to AVI?

AVI (Audio Video Interleave) is a multimedia container format, which contains both audio and video data, allows synchronous audio-with-video playback and support multiple streaming audio and video. The AVI format is high compatible with multimedia devices.

If you want to convert your Blu-ray, which is supported by so little devices, to AVI files, you need the assistant of a professional Blu-ray to AVI Ripper. With it, you can conveniently enjoy your Blu-ray movie on your PC, laptop and other portable devices.

Now I will show you how to rip/convert Blu-ray to AVI with the Blu-ray to AVI Ripper.

Step 1: Download and install Aiseesoft Blu-ray to AVI Ripper

Free download this powerful Blu-ray to AVI Ripper and install it on your computer. Then you can start up this application

Blu-ray to AVI Ripper

Step 2: Load Blu-ray Disc

Click the "Load Blu-ray" button to input the Blu-ray movie. Then all the Blu-ray playlists will be shown on the interface of this Blu-ray to AVI Ripper.

load Blu-ray to Blu-ray to AVI Ripper

Step 3: Choose output profile

You need to select one or more playlists for conversion. Then go to "Profile" drop down list to choose a preset profile for each playlist. You can also select your favorite subtitles and audio tracks for output.

choose AVI format

Step 4: Customize output AVI video effect

If you are not satisfied with the source Blu-ray movie, this Blu-ray to AVI Ripper provides you with powerful video editing features.

If you have the need to convert only part of a playlist, you can cut if off by setting the start and end time and convert the specified segment to AVI.

trim Blu-ray

Also you are allowed to crop video frame and add any watermark to the video. Even you can adjust video brightness, saturation, contrast, hue and volume.

edit Blu-ray effect

Step 5: Start to rip/convert Blu-ray to AVI

Now, everything is set up, just click "Convert" button on the main interface to start converting Blu-ray to AVI.

And now you can enjoy the AVI video conveniently on your computer, notebook and other portable devices.

Blu-ray Ripper

2011年8月24日星期三

Aiseesoft Upgrades DVD Ripper: Supports the AMD APP Acceleration

Aiseesoft, a top-ranking Windows and Mac multimedia converting software provider, updates DVD Ripper with some interesting new features. After the update, this professional DVD ripping software can bring users a much faster DVD ripping process and more convenient operations.

New features of Aiseesoft DVD Ripper:

  • Support AMD APP GPU processing acceleration technology;
  • More user-friendly graphical interface;
  • Enhance the ability of parsing DVD;
  • Support 5.1 Dolby surround sound;
  • Renew the Profile list;
  • Support outputting video without audio track;
  • Support setting video Aspect Ratio;
  • Improve the "Merge" and "Zoom Mode" feature.

The AMD APP technology is upgraded from ATI Stream technology, which enables AMD graphics processors to accelerate the AMD APP-enabled applications. With this technology, Aiseesoft DVD Ripper can rip DVD to video files with the help of AMD's GPU instead of your computer's CPU. And more spaces and resources of the CPU can be reserved for other tasks while converting DVD movies.

Now this best DVD Ripper has more powerful DVD editing functions. With it, customers can cut off any DVD segment and convert it to popular video, crop video frame and choose your preferred "Zoom Mode", add any watermark to your video, merge DVD titles/chapters, and adjust video brightness/saturation/contrast/hue/volume.

Now with all these amazing new features, Aiseesoft DVD Ripper can provide customers with much more convenient DVD ripping operations and a better output video file. With it, users can enjoy the DVD movie on portable devices, such as iPad, iPhone, iPod touch, BlackBerry, Android devices, PSP, MP4, etc. anywhere and anytime.

System Requirements

OS Supported: Windows NT4/2000/2003/XP and Windows Vista, Windows 7

Hardware Requirements: 800MHz Intel or AMD CPU, or above; 512MB RAM or more

2011年8月19日星期五

How to convert Blu-ray movie to Motorola phone (Droid X2, Atrix, Milestone)?

For Motorola phone (like Droid, Milestone, Atrix, etc.) users, it is a pleasant experience to enjoy interesting movies on the wonderful smart phones with the powerful processor and large screen.

However, I have noticed a common question from the forums that some want to put their Blu-ray movies to their new Motorola Android phones for enjoying them during the journey or some boring situation. To solve this question, we need the help of Blu-ray to Motorola Phone Converter.

Now please follow this detailed guide to convert Blu-ray movie to Motorola phone with Aiseesoft Blu-ray to Motorola Phone Converter.

First, please free download the best Blu-ray to Motorola Phone Converter and install it on your computer.

Step 1: Load the Blu-ray files to Blu-ray to Motorola Phone Converter

After running this application, please click the "Load Blu-ray" button to load your Blu-ray movie to this Blu-ray to Motorola Phone Converter.

When all the M2TS files are loaded to file list, check the main movie to choose the subtitle and audio you need.

load Blu-ray to Blu-ray to Motorola Phone Converter

Step 2: Choose the output format for your Motorola phone

Click the drop-down list of the "Profile" to choose the proper output format. Here you can choose your preferred output format according to your Motorola phone. Take Motorola Droid as an example, you can choose "Android" > "Motorola Droid Video (*.mp4)".

choose output format

Step 3: Adjust the output settings

Click the "Settings" button to set the Video Resolution, Video Bitrate, Frame Rate, Encoder and Audio Channels, Sample Rate, Encoder, Audio Bitrate, etc.

adjust output settings

Step 4: Convert Blu-ray movies to Motorola phone

The last step is to click the "Convert" button to start converting Blu-ray movie to H.264 MP4 for Motorola Droid, Milestone, etc.

After the Blu-ray movie to Motorola conversion, you can transfer the output MP4 videos to Motorola phone via USB Cable.

2011年8月18日星期四

Aiseesoft Releases Blu-ray to iPad 2 Ripper -- Helping Users Enjoy the iPad 2

In order to provide users with the best services, Aiseesoft recently prepared the Blu-ray to iPad 2 Ripper. Users can now enjoy the best iPad 2 assistant tool as soon as they get the wonderful iPad 2.

Aiseesoft Blu-ray to iPad 2 Ripper is the most professional converting software to rip Blu-ray disc to iPad 2 compatible video and audio formats. The coming iPad 2 has no Blu-ray drive. So this Blu-ray to iPad 2 Ripper can perfectly meet user needs for enjoying the latest Blu-ray movies with iPad 2.

With this Blu-ray to iPad 2 Ripper, users can convert not only Blu-ray discs, but also DVD and general video files. It can also extract and convert audio tracks from your Blu-ray/DVD/video files to WAV, OGG, 3GP, MP3, M4A, etc. Besides iPad 2, this Blu-ray to iPad 2 Converter also supports the latest iPhone 4, iPod, and original iPad.

Key features of Aiseesoft Blu-ray to iPad 2 Ripper:

  • Convert Blu-ray movie, DVD and video (including nearly all video formats) to iPad 2
  • Support video editing functions, such as trimming video length, cropping video frame, watermarking video, merging video clips, etc.
  • Define output settings (audio track, subtitle, Video Encoder, Frame Rate, Video Bitrate, Resolution, etc.)
  • Remove the DRM protections, such as AACS, BD+, MKB V21, etc., from Blu-ray disc
  • Real-time preview and batch conversion functions
  • 6X faster converting speed with NVIDIA® CUDA™ technology

Aiseesoft Blu-ray to iPad 2 Ripper is available for only $30.00

System Requirements

OS Supported: Windows NT4/2000/2003/XP and Windows Vista, Windows 7

Hardware Requirements: 800MHz Intel or AMD CPU, or above; 512MB RAM or more

2011年8月17日星期三

iPhone 5: Pre-Order on September 29 or 30?

There are many reports about the launch date of the iPhone 5 every day. According to the latest news from the website 9 to 5 Mac, the iPhone 5 is passing through the last stages of the production and Apple is all ready to launch iPhone 5 on October 7, and the pre-orders will also be available for the users on September 29 or 30. But the actual launch scheduled for either October 7th or 14th.

The company has still not finalized the pre-order start date, but is debating between Thursday, September 29th and Friday, September 30th. The 30th seems more likely at this point according to one of our sources.

According to our sources, Apple has been weighing between launching the new iPhone on October 7th or October 14th.

Certainly iPhone 5 has little difference between iPhone 4 and they support almost the same video/audio/picture formats. So this iPhone Transfer maybe helpful for you.

2011年8月16日星期二

How to Rip Blu-Ray DVD and Common DVD with Only One Ripper

So, with the growth in living standard, people pay more attention on relaxing themselves on spare time. Now the Blu-ray movie is a nice choice. But you cannot bring your DVD player with you anywhere, so put the movie on your PMP or Laptop or iPad is the best choice.

What is Blu-Ray DVD?
Blu-ray Disc (BD), sometimes called "Blu-ray," is an optical disc storage medium designed to supersede the standard DVD format. Its main uses are for storing high-definition video, PlayStation 3 video games, and other data, with up to 25 GB per single layered, and 50 GB per dual layered disc. The disc has the same physical dimensions as standard DVDs and CDs.


What is the different between the DVD and Blu-Ray DVD?
To be simple, Blu-Ray DVD uses a blue-violet laser as opposed to the red laser used on DVDs and it can hold a lot more information on them than DVDs, 25GB (single-layer)/50GB (dual-layer) but DVD and only take 4.7GB (single-layer)/8.5GB (dual-layer).


The images on blu-ray disc are sharper, brighter, and more detailed than any DVD movie. What manufacturers are trying to do is to make the movie look as close to what you see in a real theater as possible, except for its a tenth the size and in your home. Blu-Ray DVD is really nice but you have to play it on Blu-Ray player.

Part 1: How to Rip Blu-Ray DVD to Video Format?

Tools you need:

1. Blu-Ray DVD Driver
2.Blu Ray Ripper
Preparation:
You need install and run this Blu Ray Ripper

Step 1: Load your BD
Load your BD disc in to your blu-ray driver.
Step 2: Output Profile
Choose your output profile from the drop-down list according to your need. You choose output format as your devices and also with specific video format.
You can also set the specific settings of your output video, such as “resolution” “video bitrates” “encoder” and so on.

After you have done all the tings above, you need to click the start button to convert your blu-ray disc.

Tips:
You can also do many video editing works about your output video.

1. Effect:
You can adjust the “Brightness”, “Contrast”, “Saturation” of your output video and also you can select to use the “deinterlacing” function which make your video more enjoyable.
2. Trim
To pick up any part of your BD movie to converter, you can use “Trim” function.
3. Crop
You can choose any play area to convert by using the Crop function.
4. Watermark
You can add your own watermark on the output video, the watermark can be words and also picture. You can choose the font of your words and other really enjoyable function

Part 2: How to Rip Standard DVD to Video Format?

Step 1: Load your DVD
Put your DVD to your DVD Driver

Step 2: Choose your output profile
Choose your output video format according to your need.

Step 3: Video effects
You can do many video editing works with this really nice dvd ripping software. Such as trim, crop, merge and also you can add water mark to your output video.

Step 4: Conversion
Click the “Start” button to begin to rip your DVD.

Note:If you have want to put blu-ray DVD movies on your iPad, you can use Aiseesoft Blu-Ray to iPad Ripper. It can rip Blu-ray DVD movies to MPEG-4, H.264/MPEG-4 AVC, MOV and M4v, etc. for iPad.

2011年8月15日星期一

How to Copy DVD, Rip DVD, Convert Video on Mac

Many friends want to share their home-make DVDs and their DVD movies with others and also they always feel difficult to do that. Today I will share you a really easy way to Copy DVD to another DVD disc, DVD image ISO, or a DVD folder. Also I will also introduce you how to rip DVD and convert videos on Mac.

Part 1: How to copy a DVD to another DVD disc/DVD image ISO/DVD folder on Mac
Step 1: DVD Copy for Mac.
To copy a DVD on Mac, you need a DVD Copy for Mac to help you. Aiseesoft DVD Copy for Mac is a good choice.


Step 2: Load Your Source
This excellent DVD copy for Mac allows you to load DVD folder and DVD image ISO.

Step 3: Choose Output Info
1. “Full Disc” or “Main Movie”
This DVD copy for Mac enables you to copy the full disc and also the main movie according to your need.

2. “Audio”, “Subtitle” and “Volume” name
You can choose your output audio from the “Audio” drop-down list, such as “all audio”/ “None”/ or some audio the DVD provide.

Subtitle is always an important thing, you can choose your output subtitle in “Subtitle” drop-down list.

You can also name your output volume's name

Step 4: Choose Your Target
You can copy your DVD to another DVD disc, DVD folder or DVD image ISO.

Tips:
1. You can also choose to copy the menus or not.
2. All the info you choose will be dispalyed on the “Info Box”.

Part 2: How to rip DVD to video formats on Mac

Step 1: Download Aiseesoft DVD Ripper for Mac

Step 2. Load DVD
Insert DVD into your DVD-ROM, run DVD Ripper for Mac, click “Load DVD”, find the DVD folder of the movie you want to add from your DVD-ROM, and Click “Open”.


Step 3. Set output format.
This best DVD ripper for Mac provides you output formats as many as you want. Just choose one from the drop down list “profile” according to your portable player.

Step 4: Conversion
You can just Click “Start” to begin your conversion.

Part 3: How to Convert Video files on Mac

Step 1: Download Aiseesoft Video Converter for Mac


Step 2: Load video
Easily click “Add File” to load your video that you want to convert.

Step 3: Choose output profile and settings
At the bottom of the interface there are a drop-download list named “profile”. You can choose your output format here.

Tips:
1. Trim
If you want to pick up a part of the video to convert, please click “Trim” button and drag the “Start trim slider” to set the start time and “End trim slider” to set the end time. (a) You can also do that by clicking the “Start trim button” and “End trim button” (b). The third way you do that is set the exact Start/End time at the right of the pop-up window and click “OK”.(c)

2. Crop
If you want to remove the black edges or you want to convert a certain area of your video, please click the “Crop” button. You can do this either by drag the frame around the movie (a) or set the crop value: “Top, Left, Bottom, Right”.(b). Another way to do that is choose models from “Crop Mode”(c).
Aiseesoft Video Converter for Mac also allows you to chose the output aspect ratio above the crop pane, “Keep Original, full screen, 16:9 and 4:3” are available.

3. Effect
If you want to adjust the effect of your movie, please click the “Effect” button and a pop-up effect window will appear. It allows you to edit your movie’s effect including “Brightness, Contrast, Hue, Saturation and Volume”.

2011年8月10日星期三

How to convert Blu-ray disc to MKV on Mac?

If you are a Mac user, and you want to enjoy your high definition Blu-ray movies anywhere and anytime, you need a professional Blu-ray to MKV converting software. And Aiseesoft Blu-ray to MKV Converter for Mac can help users solve this problem.

With this Mac Blu-ray to MKV Converter, users can easily convert Blu-ray disc to MKV files on Mac with the perfect output video quality. Then users can enjoy the MKV video on Mac or other portable devices anywhere and anytime. Now this guide will show you how to convert Blu-ray disc to MKV on Mac.

Step 1: Install Mac Blu-ray Disc to MKV Converter

Please free download and install Blu-ray to MKV Converter. Then launch this software to prepare ripping Blu-ray disc.

convert Blu-ray disc to MKV on Mac

Step 2: Load Blu-ray disc

Insert your Blu-ray disc to the external Blu-ray drive and click the "Load Blu-ray" button to input your Blu-ray movie.

Then you can preview the source Blu-ray movie with the built-in player.

load Blu-ray disc

Step 3: Edit Blu-ray movie effect

Aiseesoft Blu-ray to MKV Converter for Mac owns powerful video editing features. You can click the "Edit" button to enter the "Edit" interface. Here you can trim video length, crop video frame, watermark video, adjust video brightness/saturation/contrast, and so on.

edit Blu-ray effect

Step 4: Set output formats

Click the "Profile" button to select the output format - "All Profiles" > "MKV Video Format (*.mkv)".

choose output profile

Tips: You can click the "Settings" button to adjust Video Encoder, Frame Rate, Video Bitrate, Audio Encoder, Sample Rate, Channel, and Audio Bitrate.

Step 5: Start converting Blu-ray disc to MKV on Mac

After all these steps, you can click the "Convert" button to begin the Blu-ray to MKV conversion. Just a while, you can get the high-quality MKV files from Blu-ray disc, then you can enjoy the videos freely.

Blu-ray Ripper for Mac

How to rip a DVD, convert video and transfer music from ipod to computer with only one tool

This guide aims to show you how to rip a DVD, convert video and transfer music from ipod to computer with only one tool.
It includes 3 parts:
Part 1. How to rip DVD to iPod/iPhone/Sansa/PSP/Zune and other MP4 and MP3 Players
Part 2. How to convert all video to MP4, AVI, FLV, 3GP, WMV, MOV, MPG, RM, RMVB, MKV, VOB…
Part 3. How to backup iPod songs and videos on your computer


Believe or not, to do the things above what you need is download Aiseesoft DVD Converter Suite and few clicks.


Part 1. How to rip DVD to iPod/iPhone/Sansa/PSP/Zune and other MP4 and MP3 Players.
Step 1. Click “DVD Ripper” on the main interface to run Aiseesoft DVD Ripper.

Step 2. Open your DVD Drive and put your DVD in it, then click “Load DVD” and choose “Load DVD” to load your DVD into this best DVD ripper.
Step 3. Choose your output format from the “profile” drop-down list. This best DVD ripper provides you so many formats that out of your expectation, such as “iPod video MPEG 4 (*.mp4)”, “iPhone 3G MOV 640*480 (*.mov)” and so on.

After you choose your output format, you can adjust your output video’s settings, such as “Resolution”, “Frame Rate”, “Bitrate”, “Sample Rate” and so on.
Click “Start” now to begin your conversion and you will get your video soon.

To make your output movie more enjoyable you can do some editings to it through this best DVD ripper. You can choose a part of your movie to convert (trim), remove the black edges of your DVD movie (crop) and also adjust the effect (effect) and select subtitle and audio track.


Part 2. How to convert all video to MP4, AVI, FLV, 3GP, WMV, MOV, MPG, RM, RMVB, MKV, VOB…

Step 1. Click “Total Video Converter” on the main interface to run Aiseesoft Total Video Converter

Step 2. Click “Add File” to load the video you want to convert.
Step 3. Choose output format by clicking “profile” and customize your own output video by
clicking “settings” to adjust the Resolution, Frame Rate, Bitrate and so on.
Before you click “Start” to begin your conversion, you can do some editing works, such as pick up a part of your video to convert(trim), choose your own play region(crop) and put two or more files into one.(merge into one file).
OK, now you can begin your conversion.

Part 3. How to backup iPod songs and videos on your computer.
Step 1. Click “iPod to Computer Transfer” to run Aiseesoft iPod to Computer Transfer.


Step 2. Plug your iPod to your computer and the Aiseesoft iPod to Computer Transfer can automatically scan and find your iPod.
Step 3. Choose the songs and videos you want to backup.
Step 4. Click “export to PC” button to transfer your songs and videos to your Computer.

2011年8月6日星期六

How to rip Blu-ray disc to WMV for Mac?

Are you trying to find the best solution of enjoying Blu-ray movies on media players which supported WMV format? Now you need the help of the professional Mac Blu-ray to WMV Ripper.

Aiseesoft Blu-ray to WMV Ripper for Mac can help you rip any Blu-ray disc to WMV for Mac with high quality and high speed.

Blu-ray to WMV Ripper for Mac

Moreover, this Mac Blu-ray to WMV Ripper for Mac owns powerful video editing features. With it, you can merge videos, crop video frame, trim video segments, add watermark etc.

Here is a step-by-step guide to show you how to rip Blu-ray disc to WMV for Mac.

Step 1: Load Blu-ray movie

Free download Blu-ray to WMV Ripper for Mac and run it. Then you can click the "Load Blu-ray" button to input the source Blu-ray disc on Mac.

rip Blu-ray disc to WMV for Mac

Step 2: Set output format

Click on the "Profile" drop-down list to select an appropriate output format. Here you can choose "All Profiles" > "WMV - Windows Media Video (*.wmv)" or "HD WMV Video (*.wmv)" as output format.

choose WMV as the output format

Step 3: Start ripping Blu-ray disc to WMV

The last step is to click the "Convert" button to rip Blu-ray disc to WMV on Mac. Then you can conveniently enjoy the WMV video on Mac or transfer it to your portable devices for enjoyment.

Blu-ray Ripper

Blu-ray Ripper for Mac

2011年8月4日星期四

How to convert DVD/movies to DPG

Have you always been thinking convert your movies and play on your Nintendo DS? The wondering can stop now. Here I recommend you you two ways to do that. One way is Moonshell + BatchDPG + AviSynth. This way is really hard to operate but it is free. The other way is really easy to do and it cost you a little: Moonshell + DPG Converter.

DPG- the abbreviation of nDs-mPeG, is a special format of MPEG-1 video specifically for playback using the homebrew Moonshell program for the Nintendo DS. The video is encoded on a computer and then transferred, along with Moonshell, to the DS for playback.

Part 1. How to convert movies to DPG with Moonshell/BatchDPG/AviSynth
There are a few things you need to download:

Step 1: Download all the programs
Tips: When you download Batch from the link in my post do not forget to copy “avisynth.dll” to C:\Windows\System32 directory.

Step 2: Input
After you install it and you will see the following interface.

In the Input section, you can load the movie you want to convert and you can also add subtitle file and audio file

Step 3: Output
In this section you need to select a temporary path and a output directory.

Step 4: Video/Audio
If you want, you can change the setting in the video and audio section. But it is set to a good format by default anyway.
To add your movie file to the queue press the button “add” at the bottom and then you can click “run” to start the converting.

Step 5: Insert you SD Card and transfer the extracted Moonshell files and converted DPG video files from your computer to SD Card.

Part 2: How to convert movies to DPG with DPG Converter

You need to download Moonshell if you don't have it in your SD Card and Download the DPG Converter.
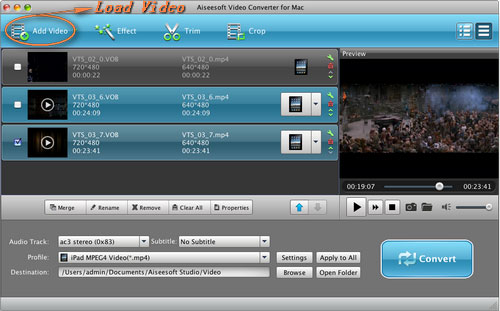
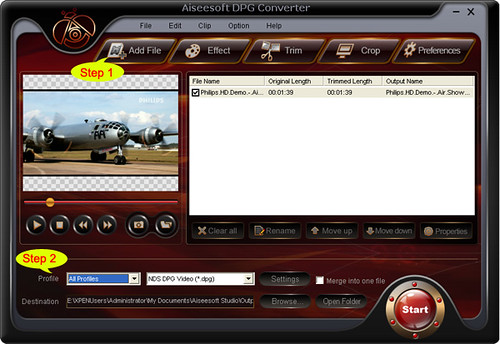


Step 1: Load files
Click “Add File” or “File”> “Add File” to load the video you want to convert.

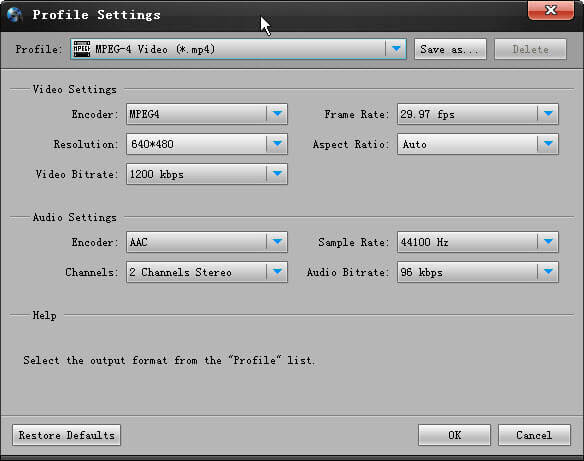
Step 2: Choose profile and adjust settings
You can choose the output profile from a drop-down list “profile”. This powerful DPG Converter can not only convert videos to DPG format, but also can convert your videos to other formats, such as mp4, wmv, avi, mpeg, mov, mkv, flv, 3gp and other popular video format.
You can adjust the settings of the output video, you can adjust the Resolution, encoder, Bitrate, and other specific settings of the video and you can also save the setting as your own profile.
After everything is done, you can click the “Start” button and later you will get your DPG movie.

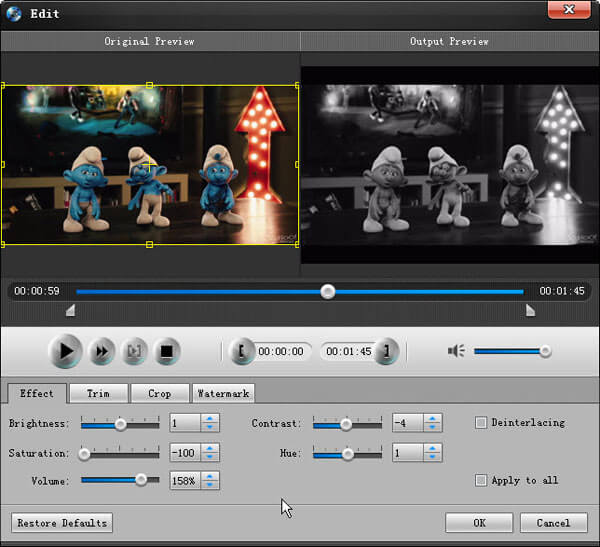
Tips: You can also do many video editing works with it:

1.Effect: You can adjust “Brightness”, “Saturation”, “Contrast” of the output video as you want

2.Trim: Tis function allows you to pick up one part of the video to convert. You can do it in 3 ways, a: set the exact start time and end time to trim b: click the “Trim From” and “Trim To” button when you preview the video c: drag the “trim bar” below the preview window and choose where to start and end.

3.Crop: You can use “crop” function to remove the black edges on your movie and you can also choose your play area. You can crop your video in 2 ways, a: drag the frame on the preview window b: set the exact crop value.

Part 3: How to convert movies to DPG with DPG Converter for Mac
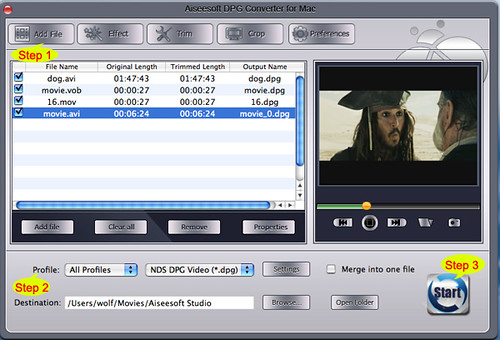


Step 1: Load the video you want to convert by click “Add File”
Step 2: Choose output profile and adjust the setting of the output video
Step 3: Conversion. Click “Start” to begin the conversion.

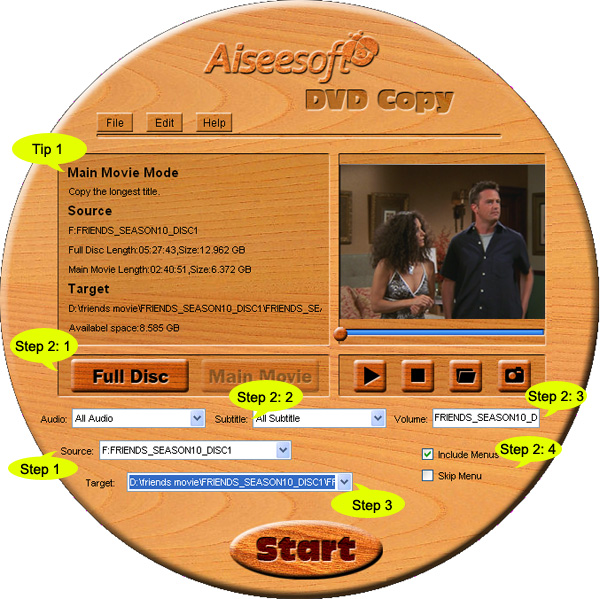
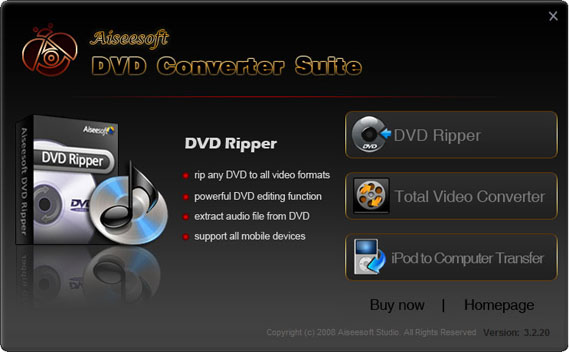
Part 4: How to convert your DVD movies to DPG format.
Here you just need a DVD to DGP Converter.
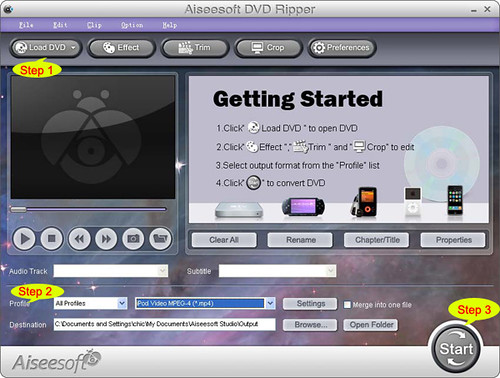
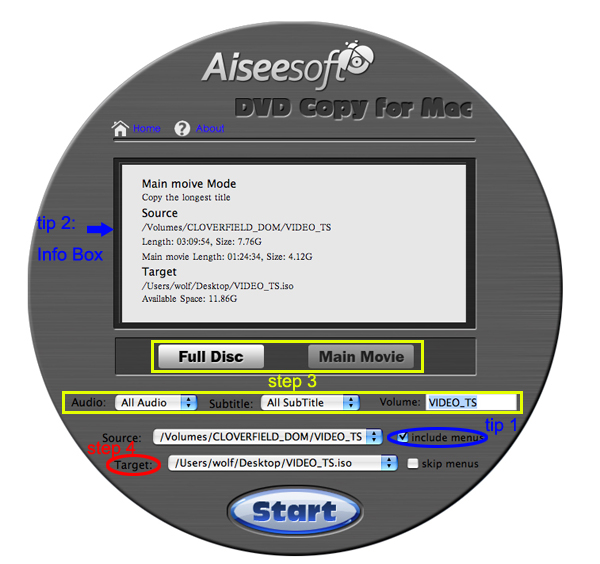
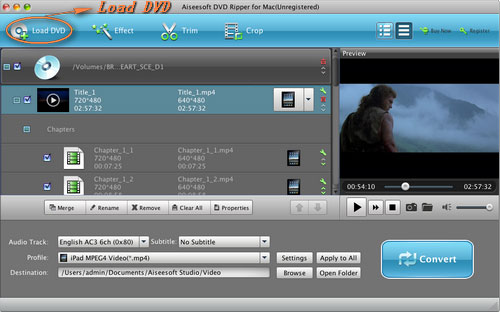
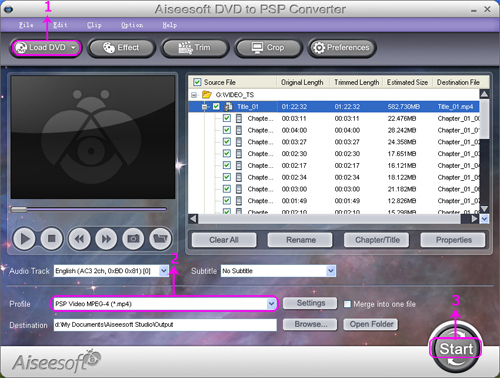


Step 1: Load your DVD
Put your DVD to your DVD Drive and click “Load DVD”.

Step 2: Choose output profile
You can choose your output profile from a drop-down list “Profile” and also you can adjust the specific setting of the output DPG video, such as encoder, resolution, bitrate and so on.

Step 3: Edit Video
You can edit the effect of the output video including “Brightness”, “Saturation”, “Contrast” and so on.
Also you can “Trim”, “Crop”, “Merge” video according to your need.

Step 4: Conversion
After all the things done, you can click “Start” button to begin your conversion.

2011年8月1日星期一

Share: How to Convert DVD to PSP/PS3, convert Videos to PSP/PS3

We all have known that PSP is an excellent game player. However, we can’t play games all the time; We can achieve other aims with it, such as watching movies, appreciating music…because it has such a big screen for video and a clear earphone for music. For the reason above, I will introduce a practical method to rip DVD movies, convert video files to MP4 format for our PSP. At the same time, we can extract audio from DVD/video files to MP3, AAC PSP audio formats for PSP music.
Now I will share with you a practical tool to solve the problem mentioned above: Aiseesoft PSP Movie Creator. It is the combination of Aiseesoft DVD to PSP Converter and Aiseesoft PSP Movie Converter.

PS3 users share the same feast!

This article includes two parts.
Part 1: How to enjoy DVD on PSP/PS3
Part 2: How to convert Videos for PSP/PS3

Part 1: How to convert DVD to PSP/PS3.
Step 0: Download Aiseesoft DVD to PSP Converter and run it.

Step 1: Click “Load DVD” button to load your DVD.


Note: This professional DVD to PSP Converter can load three DVD source, you can load your DVD from DVD drive, DVD folder in your PC and also IFO file.

Step 2: Select the output video format you want from the “Profile” drop-down list.
Step 3: Click “Start” button to start your conversion and in a short while it will be finished.

Some powerful functions such as "Effect", "Trim", "Crop" are all available.

Part 2: How to convert Videos to PSP/PS3.

Step 0: Download Aiseesoft PSP Movie Converter and run it.

Step 1: Click “Add File” button to add your movie.

Step 2: Select the output video format you want from the “Profile” drop-down list.
Step 3: Click “Start” button to start your conversion and in a short while it will be finished.

Some powerful functions such as "Trim", "Crop", "Snapshot”,"Merge" are all available.

Tips:
In the “Setting” list, you can choose different “audio bitrate”, “video bitrate”. The higher bitrate you set, the more high-fidelity video and music you enjoy on your PSP or PS3.

Key Functions-----Apply to Aiseesoft DVD to PSP Converter and Aiseesoft PSP Movie Converter

"Trim" function ------Split the DVD / video to your favorite edition
There are three methods to set trim time:
Method 1: Enter the start time in the Start Time box and click OK, then enter the end time in the Set End Time box and click OK.
Method 2: Drag the scissors bars under the preview window when you want to trim, then the time will be shown in the Start Time box and End Time box for your reference.
Method 3: Click "Trim From" button when you want to begin your trimming. Click "Trim To" button where you want to stop your trimming.

After you set trim time, the length of the captured clip will be shown in the Select Length box for your reference.

“Merge” function----Join the videos into one file.
Select the videos that you want to join, and then pick “Merge into one file”. After conversion, these chapters will be saved into one file.