2010年8月31日星期二

iPod Compatible Video

This article is divided into four parts separately introduce what is iPod Compatible Video, which video format is better for Apple iPod Video, is my video iPod compatible and how to make the video compatible with your iPod.

Part One: What is iPod Compatible Video?
Part Two: Which video format is better for Apple iPod video?
Part Three: Is My Video iPod Compatible?
Part Four: How to make the video compatible with your iPod?

Part One: What is iPod Compatible Video?
Firstly, I will introduce you what is iPod Compatible Video, iPod Nano Compatible Video such as iPod Video MP4, iPod Video H 264, the specifications page lists the following:
Apple iPod video specifications from their official website:
H.264 video, up to 1.5 Mbps, 640 by 480 pixels, 30 frames per second, Low-Complexity version of the H.264 Baseline Profile with AAC-LC audio up to 160 Kbps, 48kHz, stereo audio in .m4v, .mp4, and .mov file formats; H.264 video, up to 2.5 Mbps, 640 by 480 pixels, 30 frames per second, Baseline Profile up to Level 3.0 with AAC-LC audio up to 160 Kbps, 48kHz, stereo audio in .m4v, .mp4, and .mov file formats;
MPEG-4 video, up to 2.5 Mbps, 640 by 480 pixels, 30 frames per second, Simple Profile with AAC-LC audio up to 160 Kbps, 48kHz, stereo audio in .m4v, .mp4, and .mov file formats.

That’s a little confusing, but there’s only a few numbers you’ll need to remember for each format.

iPod H.264 Video formatThe highest video bitrate with the H.264 codec is 768 kilobits per second. The biggest picture size for your H.264 movie is 320 pixels wide by 240 pixels high, the exact dimensions of your iPod’s screen. Your iPod can play H.264 video at framerates up to 30 frames per second. Every one of the applications that we’ll be using encodes with the Baseline Profile. Your audio needs to be encoded as AAC audio up to 160 Kbps, 48 kHz, and it can be in either stereo or mono. As long as you follow all the guidelines, your movie can be a QuickTime movie or an MPEG-4 movie file.

iPod MPEG-4 Video formatYour other option, MPEG-4 video, supports a much higher bitrate than H.264 video - 2,500 kilobits per second. Using higher bitrates will also create larger files. The result: you’ll have less space for additional songs and movies. The biggest picture size for your MPEG-4 video is 480 pixels wide by 480 pixels high - three times as many pixels as your iPod’s screen is capable of displaying. Your iPod will shrink the picture proportionally so that everything fits on the screen. Again, the iPod can play videos up to 30 frames per second and our audio and file format options are the same as H.264 video.

Part Two: Which video format is better for Apple iPod video?
That’s a tough question. H.264 is arguably better because it offers high quality and a much smaller file size when compared to MPEG-4. However, both formats look quite good when you encode your video at the higher supported video settings. One thing that most people will agree on is that H.264 video takes longer to encode than standard MPEG-4. This means that converting a two hour movie to iPod video can take considerably longer using the H.264 codec (especially with QuickTime Pro’s pokey Export: Movie to iPod video option). Still, I prefer the H.264 codec in most instances.

Part Three: Is My Video iPod Compatible?
Some of the video files that you download from the web or from file sharing networks like BitTorrent may be iPod compatible - even if they’re not marked as such.

The easiest way to determine whether a video can be played on your iPod is to open the file in QuickTime and select Window: Show Movie Info. In most cases your video should be iPod-ready if the format is H.264 or MPEG-4, the audio is AAC, and the size of your video is 320 x 240 (or smaller) for H.264 or 480 x 480 (or smaller) for MPEG-4. Also, look at the data rate and make sure it’s not over 900 kbits/sec for H.264 or 2600 kbits/sec for MPEG-4.
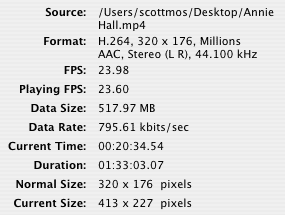
QuickTime info for iPod Video

Part Four: How to make the video compatible with your iPod?
If you have QuickTime Pro ($30 and worth every penny) or the latest version of iTunes (free!), this is, by far, the easiest conversion that we’ll talk about.

In iTunes, after you’ve added your video to the library, right click it. Select Convert Selection for iPod. iTunes will let you know if your video is already in the correct format. If it’s not, your video will slowly be converted to an H.264 video.

UPDATE: I’ve heard several complaints of iTunes creating iPod videos without sound. You should probably avoid using iTunes to convert your videos.

In QuickTime Pro, open your movie and, in the file menu, select Export… and in the export drop-down, select Movie to iPod (320 x 240) and click Save. QuickTime will create an optimized H.264 video with AAC audio.

You may want to go pour yourself a cup of tea or take a nap. If your file is large, QuickTime’s slow conversion process can take several hours.

If you’re an inexperienced user, I recommend using QuickTime Pro or iTunes because they’re absolutely foolproof. However there are other much faster, more powerful applications for converting your videos. Read on!

Don’t have QuickTime Pro? Aiseesoft iPod Video Converter!
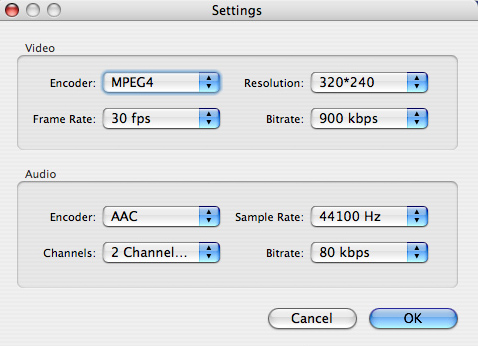
Aiseesoft iPod Video Converter supports so comprehensive video formats including converting MPG, MPEG, MPEG2, VOB, MP4, M4V, RM, RMVB, WMV, ASF, MKV, TS, MPV, AVI, 3GP,3G2, FLV, MPV, MOD, TOD to iPod Video MP4, iPod Video H 264. You can customize your own output video by the settings function. For example, if you want a high quality video you can raise the values of Video Biterate, Audio Biterate and Audio Sample Rate, if you want a smaller file you can reduce the value.
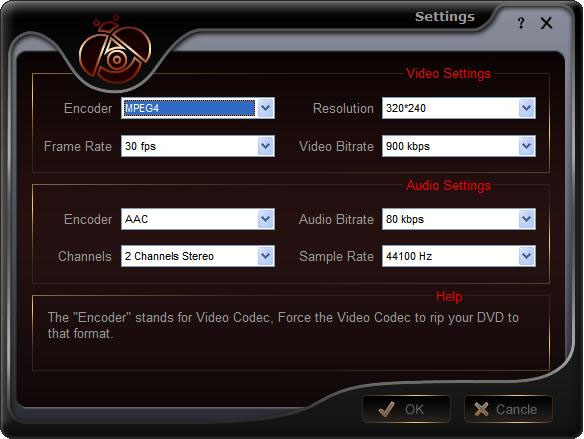
Settings

If you want to make your DVD compatible with your iPod and even transfer your iPod video to Computer, you can choose Aiseesoft DVD to iPod Suite which is an all-in-one solution to convert DVD to iPod Video MP4, iPod Video H 264 and convert video to iPod Video MP4, iPod Video H 264. Moreover, it can transfer video from iPod to computer. You don’t need to worry about losing anything.
For Mac user, you can choose Aiseesoft iPod Video Converter for Mac and Aiseesoft DVD to iPod Suite for Mac.

2010年8月30日星期一

How to reformat an iPod

This is a tutorial about how to reformat Windows Formatted iPod for Mac and how to reformat Mac Formatted iPod for Windows. There are 2 parts:
Part 1. How to reformat Windows Formatted iPod for Mac
Part 2. How to reformat Mac Formatted iPod for Windows

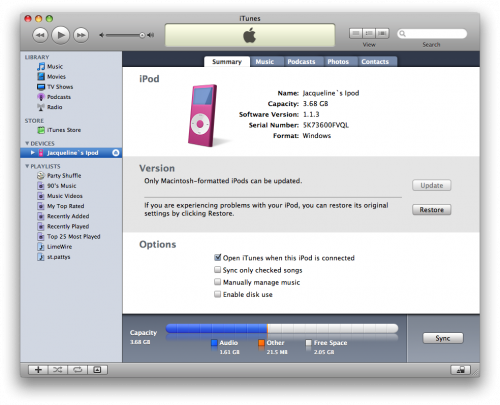
The way you see if an iPod is Mac or Windows-ready is to go to Settings --> About and scroll to the bottom of the screen. If it's formatted for Mac OS X, then the last item will be the serial number of the iPod. If it's Windows-ready, then after the serial number will be "Format: Windows". Simple enough, if a bit obscure.
If you wish to keep the songs you have on the iPod, you must first follow this tutorial to backup your iPod files to your computer.

Part 1, How to reformat Windows Formatted iPod for Mac
Step 1 Launch iTunes by selecting its icon in the dock
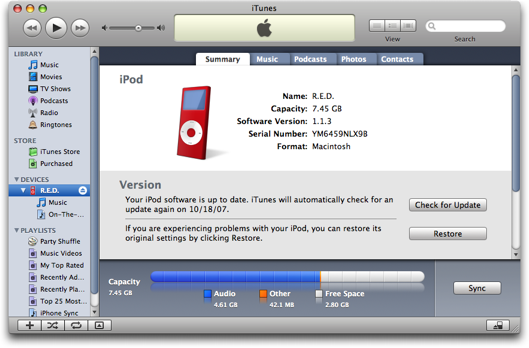
Step 2 Connect your iPod to the computer. Once it shows up in iTunes press the Restore button under the Summary Tab.

reformat windows formatted iPod

Step 3 A popup will appear warning you that all the songs on your iPod will be erased. Click the Restore button.
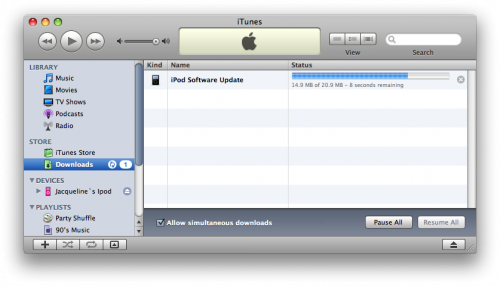
Step 4 An iPod Software Update window will open. Click the Next button.
Step 5 Click the Agree button to accept the license agreement.
Step 6 iTunes will now go and download the latest firmware for your iPod.

reformat windows formatted iPod

Step 7 Once installation begins it will ask you for an Administrator's username and password. Enter this information then click the OK button.
Step 8 iTunes will then format and update your iPod after which it will reboot.
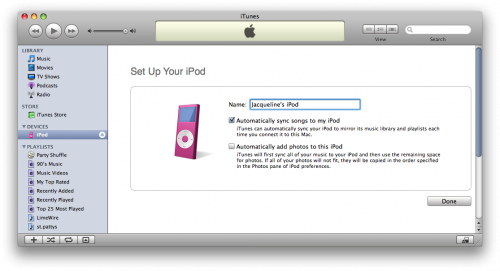
Step 9 Once complete you will be asked to name your iPod. Do this then press the Done button.

reformat windows formatted iPod

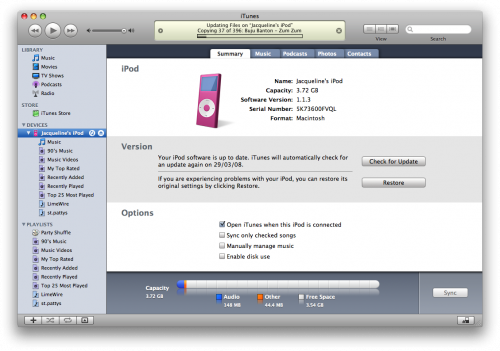
Step 10 iTunes will now automatically begin syncing your library to the iPod!

reformat windows formatted iPod

Part2. How to reformat Mac Formatted iPod for Windows
Step 1, Download the latest version of iTunes
Your first step should be to ensure that you have the very latest version of iTunes. You can do that by going to Download iTunes. Install that, and when you hook up your iPod, you should see it show up in iTunes, then when you click on the iPod on the left side of iTunes, you'll get to the summary screen.

iTunes

Step2 , Click the "Restore" button and you should be prompted to choose between four different options:
Restore Option 1: Restore - Restores with same iPod Software version already on iPod.
Restore Option 2: Use Same Version - Restores with same iPod Software version already on iPod even though a newer version is available.
Restore Option 3: Use Newest Version - Restores with the latest iPod Software available.
Restore Option 4: Restore and Update - Restores with the latest iPod Software available.

2010年8月29日星期日

How to use Mac TS converter to convert TS to MP4, MOV, etc on Mac OS X

What is TS?
Transport stream(TS, TP, MPEG-TS, or M2T) is a communications protocol for audio, video, and data which is specified in MPEG-2 Part 1, Systems (ISO/IEC standard 13818-1). Its design goal is to allow multiplexing of digital video and audio and to synchronize the output. Transport stream offers features for error correction for transportation over unreliable media, and is used in broadcast applications such as DVB and ATSC. It is contrasted with program stream, designed for more reliable media such as DVDs.
TS format is a container format that encapsulates pocketsize elementary streams and other data.
Important elements of a transport stream: Packet, PID, Programs, Program Specific Information (PSI) , 1 PAT , PMT , PCR , Null packets

How to play TS files on Mac?
You need media player to play TS files on Mac OS X:
VLC media player is a highly portable multimedia player for various audio and video formats (MPEG-1, MPEG-2, MPEG-4, DivX, mp3, ogg, ...) as well as DVDs, VCDs, and various streaming protocols. It can also be used as a server to stream in unicast or multicast in IPv4 or IPv6 on a high-bandwidth network. It supports Mac, linux, Windows.
How to convert TS to MP4, AVI,MOV, etc on Mac?
You need a video converter for Mac to convert TS to MP4, AVI, MOV, etc on Mac. Then you can put them on iPod, iPhone, PSP, Xbox 360, iMove, other potable players.
Step 1: Download TS Video Converter for Mac:
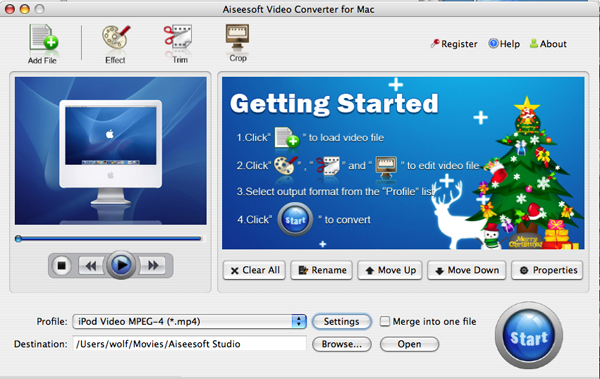
We recommend you Aiseesoft Video Converter for Mac which can convert TS to MP4, Convert TS to AVI perfectly. This Mac TS Video Converter also can extract audio from TS and Convert to MP3, M4A, etc. Compared with other video converters, this TS video converter for Mac provides you with better output quality, more advanced functions and higher conversion speed. You can download free trial Version here: for Mac intel users, for Mac PowerPC users. Then install and run this program. The trial version should be fully functional for what you want to do.
Step 2: Load the TS files you want to convert

Video Converter for Mac

Click the "Add File" button to browse your computer hard disc and add the .TS files you want to convert to the program.
Step 3: Output Settings
After you added TS files, you can select an output format for each video file and specify a directory on your computer to save the output files.
The TS Converter for Mac supports comprehensive video formats including AVI, MPEG, WMV, MP4, XviD, 3GP, FLV, etc.
If you don't know what formats your device supports, you can just select the format according to the device name. Of course, if you don't want to use the default video and audio encoding settings, just click the "Settings" button to customize these settings.

Video Converter for Mac - settings

Step 4: Edit your TS files
This TS Video Converter for Mac set video brightness, contrast, saturation, crop video, trim video/audio and even merge multiple files into one file.

Step 5: Start the conversion
Click the Convert button to start conversion and then you can just go out for a walk or take a nap, and the conversion may have been finished when you come back: )

Modifications of transport stream specification for random-access media (M2TS)
Transport Stream was designed for tape and broadcast, but it required modifications for usage with random-access media devices like new generation of digital camcorders that record onto DVD disks, hard drives or solid-state memory cards.
Random-access based systems may save data packets into a temporary buffer if a storage device is not ready, for example on device startup. Packets are written out of order, and to keep track of them, a 4-byte timecode (TC) is added to standard 188-byte packets. The result is a 192-byte packet. This is what is informally called M2TS stream. Sony calls it "BDAV MPEG-2 transport stream". JVC calls it TOD (possibly an abbreviation for "Transport stream on media") when used in HDD-based camcorders like GZ-HD7.[9] M2TS transport stream is also used for AVCHD video files, which often have MTS extension.

2010年8月27日星期五

Netflix Premieres on the iPhone

It’s been nearly three months since Netflix CEO Reed Hastings debuted the company’s iPhone app at Apple’s Worldwide Developers Conference, and this morning it finally shipped (iTunes link). Beginning today, paying Netflix (NFLX) subscribers can view the company’s “Watch Instantly” library on their iPhones and iPod touches, as well as on their iPads. Like its larger sibling, it’s a slick little app that extends a respectable and growing video-on-demand service to Apple’s (AAPL) smaller iOS devices.

2010年8月25日星期三

And With an Arrest, Trial and Conviction, We Can Make an Album

Sign o’ the times. Making its debut on the Billboard Hot 100 hit list at No. 89–just below Justin Bieber and Young Jeezy, and a spot above Brad Paisley–is an Internet interloper: The “Bed Intruder Song,” the latest in the Auto-Tune the News series from the Gregory Brothers. It is undoubtedly the catchiest song ever adapted from a TV interview of a man who thwarted an attempted rape. The video became an immediate YouTube hit when it was posted a few weeks ago, and hot sales of an expanded version in the iTunes music store propelled the song onto the mainstream charts.

2010年8月24日星期二

Japan’s Unsung Tech Heroes

Once synonymous with cool gadgets, Japanese consumer-electronics brands like Sony (SNE) and Panasonic (PC) are now scrambling to keep up with Samsung Electronics and other fast-growing Asian rivals.

But in the less glamorous world of tiny electronic parts inside gadgets, Japan still commands a large market share. Few consumers recognize the makers of the so-called passive components, a category that doesn’t include semiconductors. But they are the unsung heroes in Japan’s otherwise struggling electronics industry.

According to Japan Electronics and Information Technology Industries Association, the country’s electronic parts makers currently hold 40 percent of the global market based on the value of output. The category “electronic parts” does not include semiconductors.

You may have never heard of Nidec, but your PCs and cameras probably carry its components. The Kyoto-based company, which made headlines last week with a U.S. acquisition, controls about 80 percent of the global market for precision motors in computer hard drives, and about 70 percent of the market for digital camera shutters.

Read the rest of this post on the original site

2010年8月23日星期一

How to sync and put cusomized ringtone on iPhone

There are also some other ways to convert audio to iPhone ringtone and sync it to iPhone with iTunes, but I think these are a little complicated and users may be at a loss with such ways.

Here I recommend iPhone PC Suite, an almighty iPhone manager that can let you manage phone book, software, media and other files between iPhone and computer without iTunes easily.

But before using this tool, make sure your iTunes installed and has been connected with iPhone once before (Then you will never need not run iTunes when you use iPhone PC Suite to manage your iPhone).And when the first time you connecting iPhone, it will install PhoneDaemon on your iPhone, don’t worry it is green software and will do nothing harm.

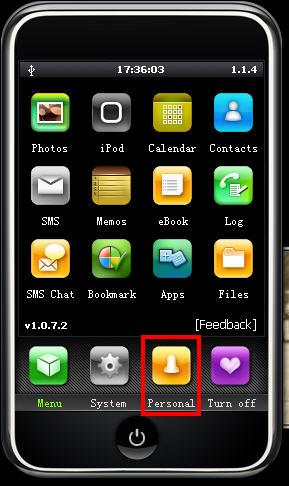
Now I will show you how to sync the converted iPhone ringtone to iPhone without iTunes. Connect you iPhone to computer, double click” iPhone PC Suite” to start iPhone PC Suite, the program will scan you iPhone automatically for a short while. Then click button “Personal” on the main menu, select ”ringtone”.

put ringtong on iPhone

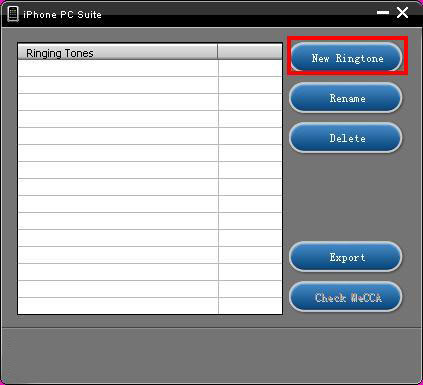
Click “New Ringtone” to locate the converted iPhone ringtone.put ringtong on iPhone

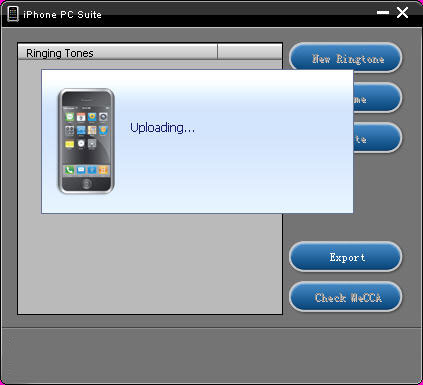
Select your target iPhone ringtone, then it will upload the ringtone to iPhone automatically.

put ringtong on iPhone - ringtong loading

Then you can select your favorite audio file and set it as your iPhone ringtone on iPhone. Click “setting”->”Sound”->”Ringtone”, the converted ringtone is listed on column “Customize”. Now you can enjoy the fun of your unique iPhone ringtone!
This free iPhone PC Suite also has other powerful functions, we will share them later.

Previous part: How to convert DVD, Movie, Music to iPhone ringtone and put ringtone on iPhone?